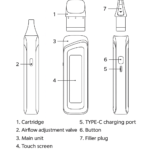
Specifications
Materials: PC Aluminum alloy ADC12 PCTG
Dimensions: Length: 114.98mm Width: 26mm Thickness: 15.65mm
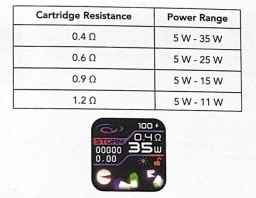
Cartridge Specifications: 3ML 0.4Ω/0.6Ω/0.9Ω
Net Weight: 54.7g
Output Power: Maximum 35 W
Battery Capacity: 1300 mAh
Quick Guide
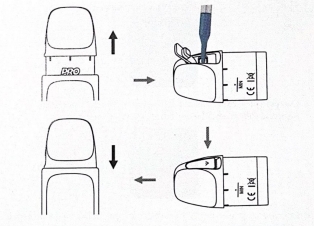
- Take the cartridge off the device, then remove the insulating film from the bottor
- Fill e-iquid into the filling port, and then wait for 10 minutes after its frst flling.
- Insert the cartridge into the device, press the button 5 times in 2 seconds to turn on the pod system, then draw to vape or press the button to vape.
Instructions
1. Cartridge Filling and Replacement
a. Take the cartridge off the new device for the first filling and remove the insulating film on the bottom of the cartridge before use.
b. Open the filler plug and fill the cartridge with e-liquid.
c. Put the filler plug back after filling.
d. Insert the cartridge back into the device.
e. For the cartridge replacement, please remove the used cartridge and insert a new one.
Attention:
a. Insert the nozzle of the e-liquid bottle into the filling port to fill it with e-liquid.
b. Please put the filler plug back as soon as the filling is done, and make sure it is properly sealed to prevent e-liquid leakage.
c. Let the cartridge sit for 10 minutes after the first filling to avoid coil burning.
d. Please make a timely refilling when the e-liquid is under the MlN level.
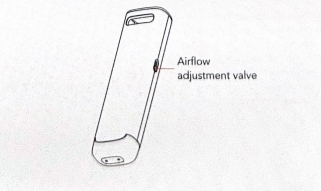
2. Airflow Adjustment
Insert the cartridge into the device and adjust the airflow with the airflow
adjustment valve.
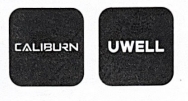
3. Turn On/Off
Press the button 5 times within 2 seconds to turn on/off the device, The screen will show “CALlBURN” when turning on and show “UWELL” when turning off.
4. Standby
The screen will be off in 10 seconds if without any operation, and the device
will be on standby.
5. Menu Setting
a. Mode Choosing: Press the button 4 times to enter the menu setting interface, choose from the “THEME” 、”MODE”、”DAY” 、”NIGHT” or “PUFF” mode, and long press to confirm, then the screen will return to the main user interface.
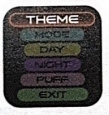
b. Theme Choosing: Long press the “THEME” button to enter the menu of theme setting interface. Choose the preferred theme, and long press to confirm, then the screen will return to the main user interface. lf there’s no operation within 3s, the system will choose the current theme automatically.

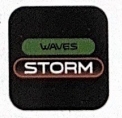
c. Mode Choosing: On the menu interface, press to choose “MODE” and long press to enter the mode selection menu. Press to switch between “WAVES” and “STORM” and long press to confirm the choosing. After that, the system will back to the main user interface. lf there’s no operation within 3s on the mode choosing interface, the system will choose the current mode automatically.
d. Brightness Choosing: On the menu interface, press to choose “DAY” or
“NlGHT” and long press to confirm the choosing. After confirmation, the
system will back to the main user interface with the currently chosen brightness.
e. Puff Record Resetting: Press the “PUFF” button on the menu interface and long press to reset the puff record, After resetting the puff record, the screen will return to the main user interface.

f. Menu Exiting: 1. Long press the “EXIT” button on the menu to exit this
interface; 2. The screen will go back to the main user interface in 3 seconds
if without any operation.
6. lgnition Mode Switching
- When turning on the device for the first time, the device will onter the auto mode by default, which supports both alr activation and button activation.
- Press the button twice in 2 seconds to switch to air activation mode and lock the button ignition function.
- Press the button twice in 2 seconds to switch to the auto mode and unlock the button ignition function.
7. Vaping
Please take a draw or press the button to vape when the device is turned on.
8. Puff Record
a. The device will only record puffs that last over 0.3 seconds. The puffs that last less than 0.3 seconds will not be counted. The maximum number of records is 99,999; the recorded numbers will be reset to 1 automatically
when exceeding 99,999.
9. Power Adjustment
a. Press the button 3 times in 2 seconds to enter into power adjustment mode. The output power wattage will flash on the screen during adjusting.
b. Press or long press the button to choose a preferred power among the corresponding power range.
c. Wait for 3 seconds or take a draw to confirm the power setting, then the output power wattage will stop flashing on the screen and exit the power adjustment mode.
10. Battery Level Indication
The screen will indicate the percentage of battery level in real-time.
11. Charging
When connecting the device to a power source through a TYPE-C charging
cable, the screen will show the charging animation.
When it stops charging, the screen will go back to the main user interface.

12. Protection and indication
a. Short-circuit protection: When a short-circuit occurs, the screen displays “Atomizer short!” and the device stops outputting.

b. Low voltage protection: When the power is low, the screen displays “Battery Low!” and the device stops outputting.

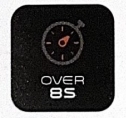
c. Overtime protection: The screen displays “Over 8s!” to indicate an over
8-second vaping, and the device stops outputting.
d. Open-circuit protection: When an open-circuit occurs under a no cartridge or disconnection situation, the screen displays “No Atomizer” and the device stops outputting.

Warm Tips
- Please charge with the certified power adaptor (5V/2A) and USB cable.
- Please remove the cartridge from the device and store it separately wher
you travel by air, for the air pressure change may cause leakage. - Avoid high temperature, low temperature,fammables, explosives, water
and humid environment during the use or storage of the product. Please
do not keep the product with hard objects to avoid damage, Please charge the device at least once a month.