Introduction
Equipped with two pod options (powered by the advanced Dual Core Dual Meshed and upgraded RPM3 coils), the NORD 6 efforlesy produces massive flavo and rich vapor. Backed by a vivid 1.65″ HD touch screen, an extra-large 3800mAh battery and 2.0A fast charging, it supports cusomizable vaping from 5-80W across three output modes, along with puff tracking and a 5mlL capacity for all-day enjoyment.
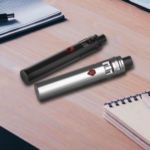
The Kit Includes

Specifications
Size: 36.5*24.7*118.88mm
Weight: 145g
Battery Capacity: 3800mAh
Resistance Range: (0.10Ω-2.50Ω)±5%
Charging Voltage: 5.0V±0.2V
Charging Current: Max 3.0A
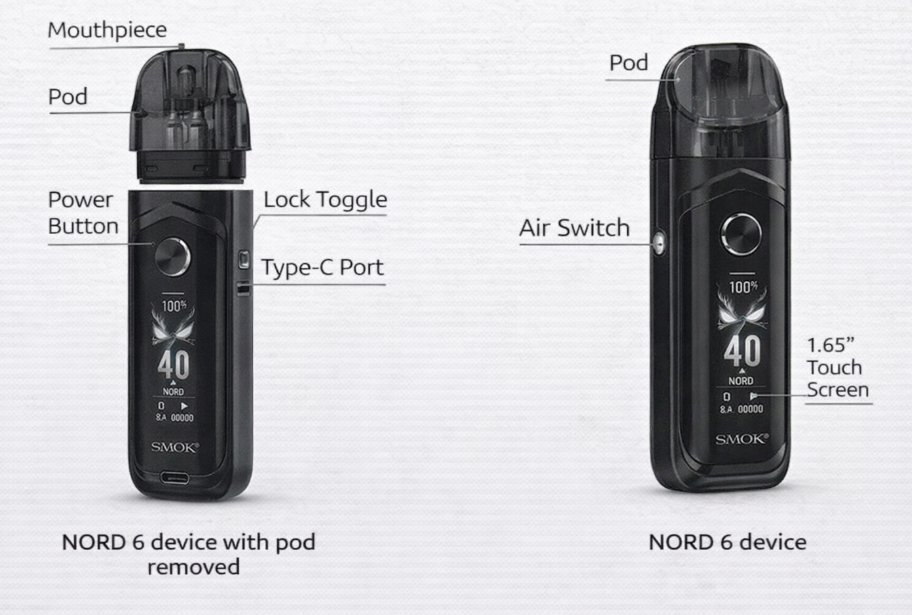
Your NORD 6 Device
Getting Started
Please read this manual carefully before using the product.
Preparing your NORD 6 device for use
Unpeel the plastic films of the device before use.
Charging
The NORD 6 device is charged using the Type-C cable provided. When the type-c cable is inserted, the dynamic charging interface will be displayed
with the battery percentage and the remaining charging time.
Important information about charging
- The product should be charged between 10°C to 45℃/50°F to 113°F.
- Do not charge this product outdoors or in a hot, cold, damp environment or in direct sunlight as short circuit may occur.
- Unplug the type-c cable within 2 hours of the battery being fully charged to extend the life of the battery. Do not overcharge the batteries.
- Only use the original type-c cable provided and UL-Listed charging sources.
- Do not use this product if abnormal heat is generated during charging.
- Do not use any power source without legal manufacturing licenses.
- Do not charge this product near:
Any source of heat, such as a fire,hot stove or a radiator.
Combustible or explosive materials or gas.
For NORD 6 Pod (Side-Fill)
Opening and Closing instructions for Filling and
Refilling E-liquid
Opening:
1. Pull the pod out from the device.
2. Pull out the rubber plug to open the filling port; then insert
the nozzle of an e-liquid refill container into the filling port.

Closing:
3. Push back and press firmly the rubber plug to close the filling port of the pod.
4. Install the pod back to the device.

*Do not inhale immediately after filing the pod. Let it stand for several minutes to get the cotton completely saturated.
Opening and Closing Instructions for Replacing New Pod
- Pull the pod out of the device.
- Push the new pod into the device.

For NORD 6 Pod (Top-Fill)
Opening and Closing instructions for Filling and Refilling E-liquid
Opening:
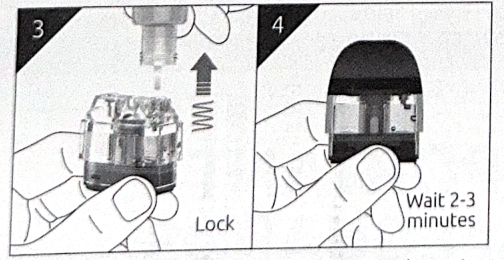
1. Remove the top cap.
2. Firmly insert the nozzle of an e-liquid refil container into the spring-loaded filling port to fill the pod with 2ml of e-liquid, at this time, the silica gel is pressed and the spring bolt unlocks.

Closing:
3. After the filling is finished, the silica gel is not pressed and
the spring bolt automatically locks.
4. Install the top cap back carefully and wait 2-3min to prime
the coil.
*Do not inhale immediately after filling the pod. Let it stand for several minutes to get the cotton completely saturated.
Opening and Closing Instructions for Replacing New Coil
- Pull the coil head out of the pod.
- Push the new coil head into the pod.

Prime the coil
Before inserting the pod into the device, inhale on the mouthpiece 2-3 times to draw e-liquid into the coil. Priming the coil before use optimizes the vapingexperience and avoids burning the coil.
How to control air input
Toggle the air switch to control the amount of air intake.
Using your NORD 6 Device
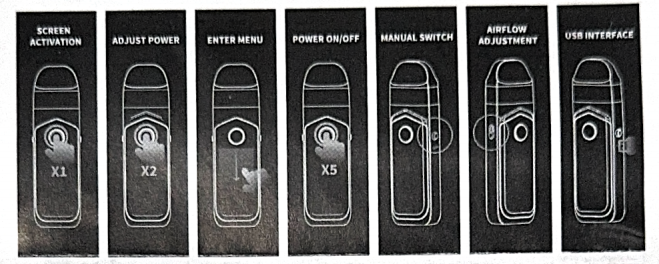
- Power on
While the device is off, quickly press the Power Button 5 times to turn it on. The interface will display SMOK and the
product model, and then enters the main interface. - Check the mouthpiece is clean
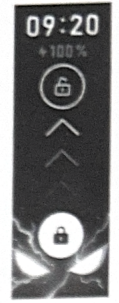
Before vaping check that the mouthpiece is clean. Do not inhale if the mouthpiece is dirty or contains foreign objects. - Unlock/lock the touchscreen

When the touchscreen is locked, the touch-to-unlock interface appears. If no action is taken within 5 seconds, the device turns off the display and enters standby mode.
Swipe up or press the power button 3 times in succession to unlock the touchscreen. - Set the function menu
When the touchscreen is unlocked, swipe down to enter the function menu interface.
Swipe up and down to select the function to be set.
Click ‘EXIT’ or swipe right to exit the Function menu interface.
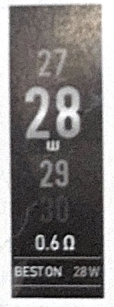
(1) ADJUST POWER: Adjust the wattage Swipe up and down to select the wattage to be adjusted.
Note: Wattage adjustment cannot be performed cyclically.
The wattage adjustment interface displays the current resistance and its best power.
Click the customized wattage or press the power button to confirm the selection.
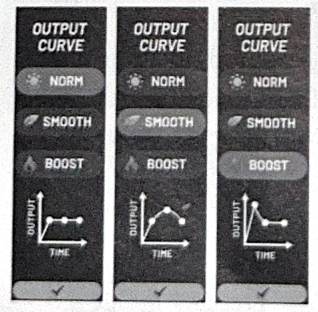
(2) OUTPUT CURVE: Select the output mode: NORM/SMOOTH/BOOST
Click to select the output mode and click “√” or press the power button to confirm the selection.
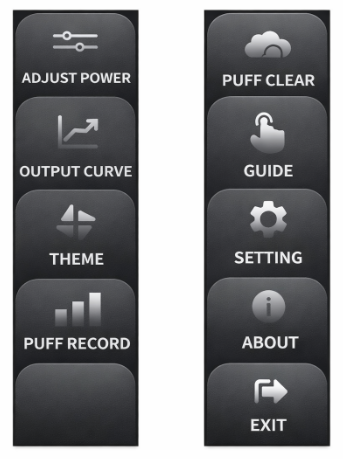
(3) THEME: Select a theme from THE FLASH/AURORA/FLOWER/COLOR DIAMOND
Swipe up and down to select a theme from 4 choices, Click the center screen to confirm the selection and return to the main interface.
(4) PURFF RECORD: 7-day puff data recording
Check daily puffs in the last 7 days.
When the touchscreen is locked, press and hold the power button to enter ‘PUFF RECORD’.

(5) PUFF CLEAR: Clear the total puffs
Click YES/NO to clear or remain the total puffs.
The total puffs will automatically recount from one when it
reaches 9999p.

(6) GUIDE: operation instructions
Swipe up and down to scan the operation instructions.
(7) SETTING: SMART REMIND/SCREEN BRIGHTNESS/ANIMATION/SET TIME/DATE
Swipe up and down to select the function to be set.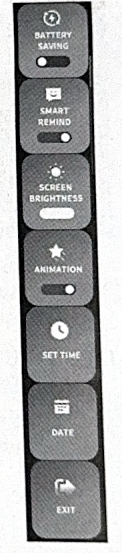
- SMART REMIND: Set greeting and wellness tips.
-COOD MORNING: greeting at 7AM-9AM.
-GOOD NIGHT: greeting at 22PM-24PM.
-STAY HYDRATED: when vaping more than 100p in 10 minutes in succession. - SCREEN BRIGHTNESS: Adjust the screen brightness.
- ANIMATION: Activate or cancel the animation while vaping or on the main interface.
- SET TIME: Set time (12-hour system or 24-hour system).
- DATE:Set date.
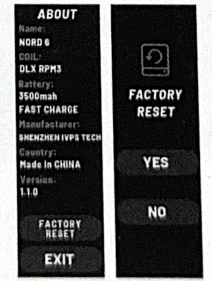
(8) ABOUT: Display the product information.
FACTORY RESET: resume to default setting
5. Set The Manual Switch
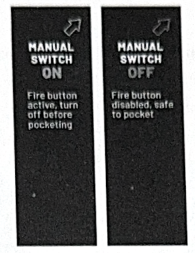
MANUAL SWTICH ON: Toggle the switch from the right to the left. The fire button is activated, and you can press the button to vape, so you need to turn it off before pocketing.
MANUAL SWTICH OFF: Toggle the switch from theleft to the right. The fire button is disabled, and you cannot press the button to vape, so it’s safe to put the device into the pocket.
6.Vaping
MANUAL SWITCH ON: Inhale through the mouthpiece or vape by pressing the Power Button.
MANUAL SwITCH OFF: Simply inhale through the mouthpiece to vape.
When vaping, the vaping animation will be displayed (in ANIMATION ON state); after vaping, the animation is delayed by 2 seconds.
Do not vape for more than 8 seconds.
A “TIME OVER” notification will occur if vaping exceeds 8 seconds.
If you feel unwell vaping, including if you have a headache or are feeling nauseous stop vaping immediately and seek medical attention.
7. Power off
To turn the power off, quickly press the Power Button 5 times.
Disposal
Do not dispose of the vaping device, e-liquid or pods in the general waste, please follow local laws and regulations for recycling and disposal.
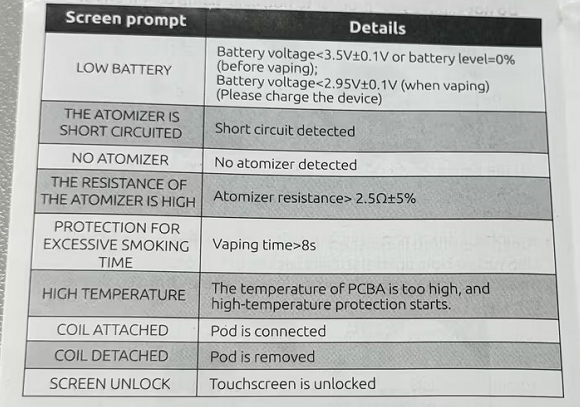
Function Prompts
The meaning of the function prompts is described below:
Attention
Please read this manual carefully before using the product.
Inappropriate use or handling of this product may be harmful.
• This product is only intended to be used as an e-cigarette, for the consumption of certain e-liquids. Do not use this product for any other purpose. This product is not designed to be a smoking cessation device.
• Please use the tank/pod provided in this kit. Do not use tanks/pods of other brands with this
• The suggested ratio of e-juice is 30%PG: 70% VG.
• Before using this product, please read carefully any information and instructions for use relating to the e-liquid which is vaped using this product.
• Always check that the e-liquid has not expired.
• The SMOK product must not be offered for sale outside of, independently or separately to, the box or this leaflet.
• Do not vape excessively. If you feel unwell vaping, including if you have a headache or are feeling nauseous stop vaping immediatel and seek medical attention.