Parameters
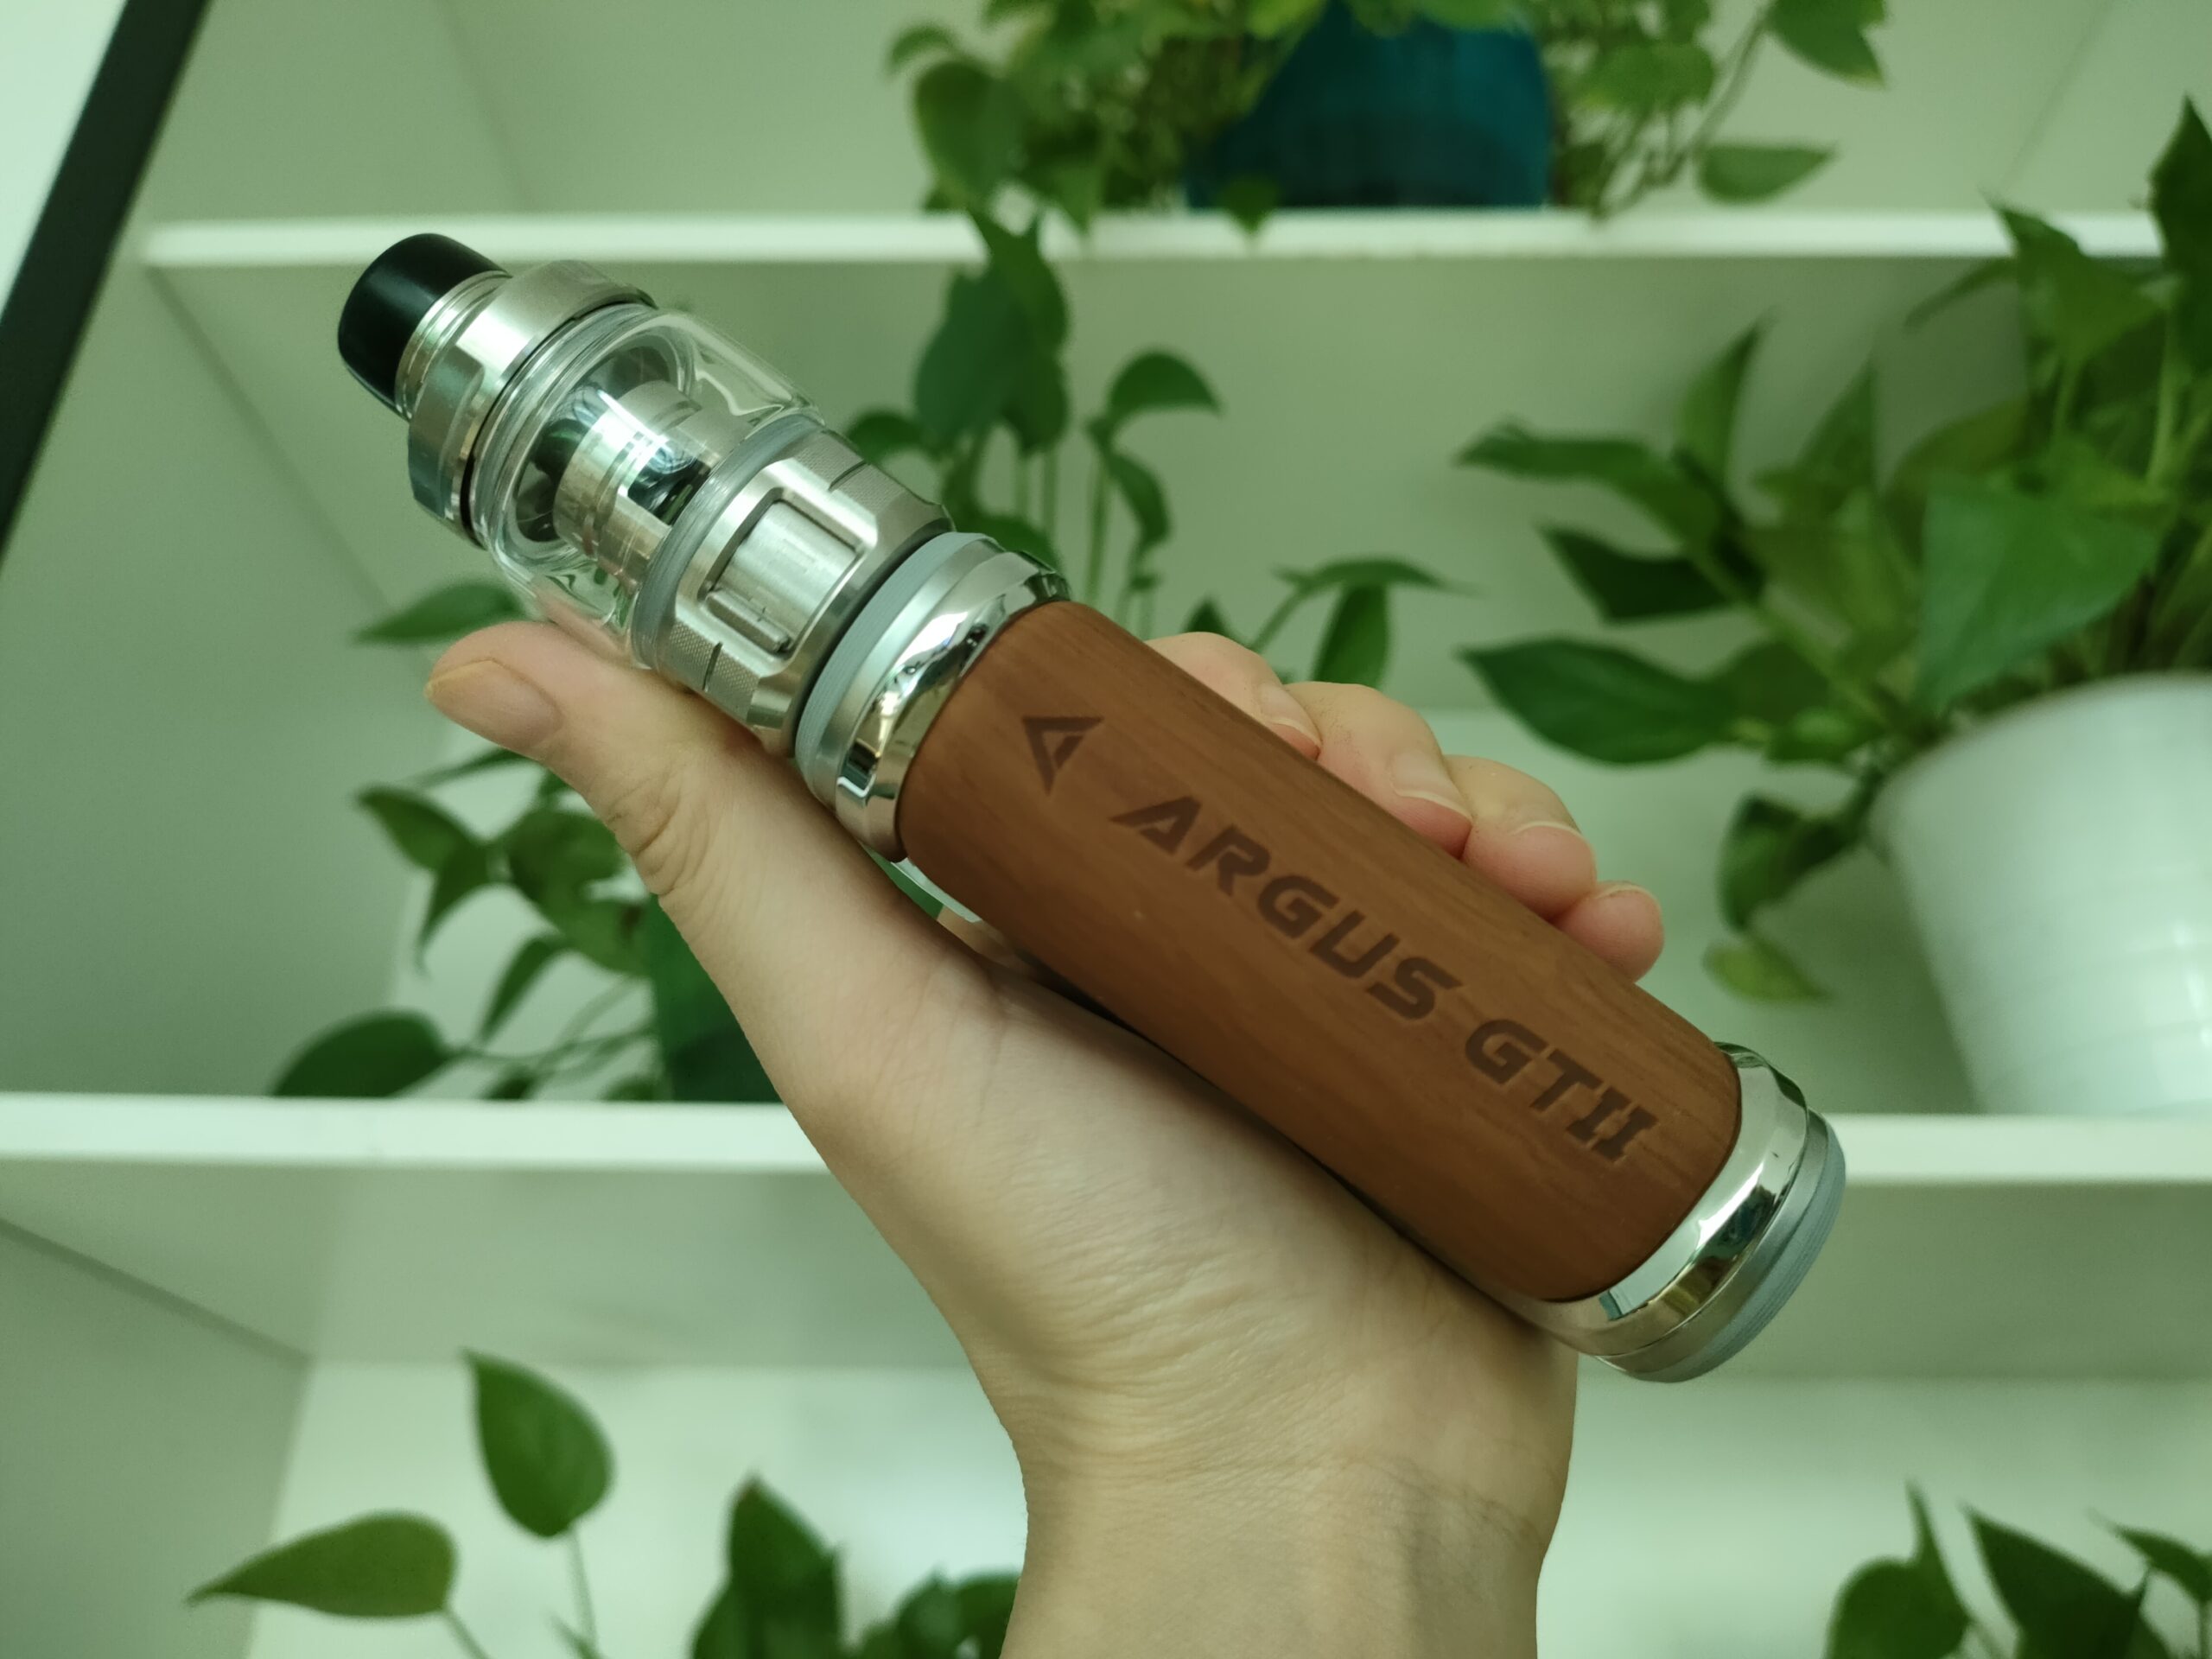
Size: 124.25*33*28 mm
Battery Capacity: 3000 mAh (Built-in)
Input Voltage: 3.2-4.2 V
Power Range: 5-60 W
Charging Voltage: 5V/12A
Resisiance Range: 0.2-3.0 ohm
E-liquid Capacity: 5 ml (Standard Edition) / 2 mL (TPD Edition)
Other Optional Coil: Compatible with all PnP X coils
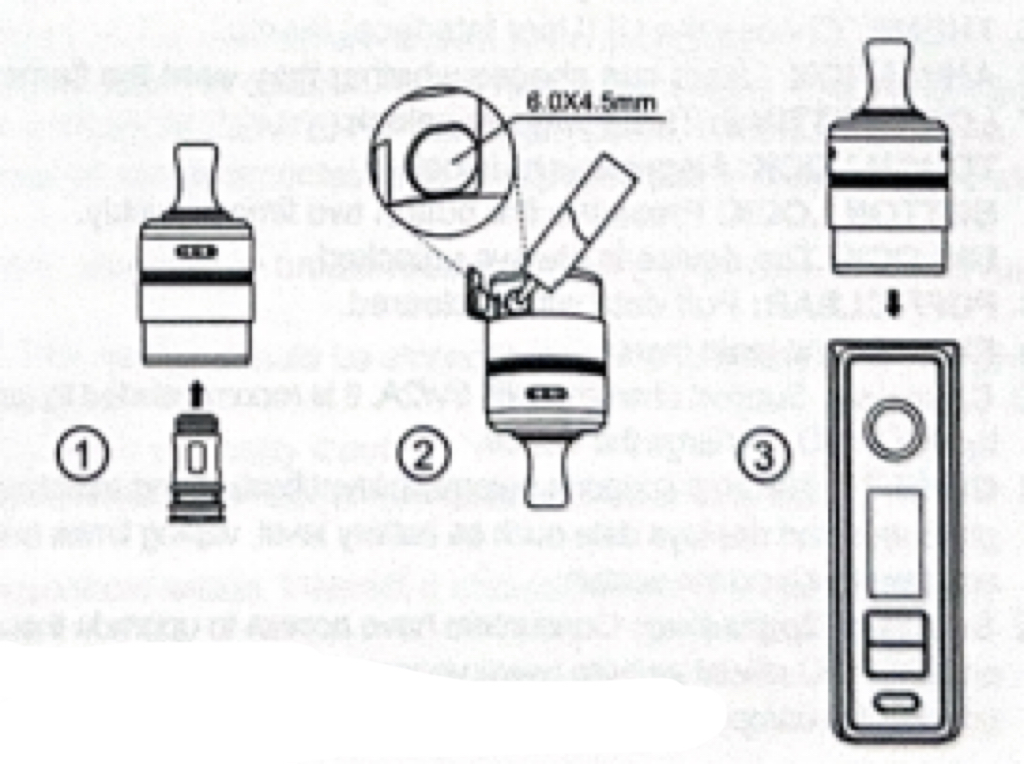
Operations Steps
Spet 1. Install coil
Remove coIl from packaging and insert into the bottom of cartridge.
Step 2. Fill e-iquid
Open the lid on the filling port, then fill in the e-iquid.
It is recommended to keep the cartridge two-thirds full.
Step 3. Install the cartridge
insert the cartridge with e-iquid into the device.
Step 4. Start to use the device
After keeping it stand for about five minutes, you are free to use the device.
You can rolate the metal ring at the top of the cartridge to adjust the airflow for optimal vaping experience.
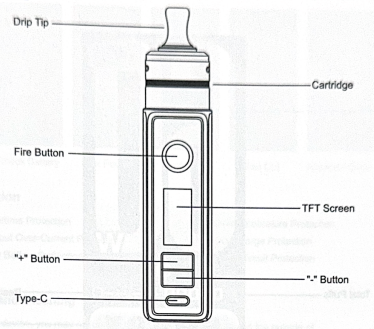
Interface Introductions
Function Descriptions
1. ON / OFF: Press the fre button five times quickly.
2. LOCK/ UNLOCK: Smart touch unlock. Enter the menu and select the unlock method.
3. MENU: Press the fire button three times quickly, use the “+” or “-” button to select the setting option, and then press the fire putten to confim.
4. MODE: After entering the setting interface, select the “Mode” option, then select the mode of the device on the sub-interface:
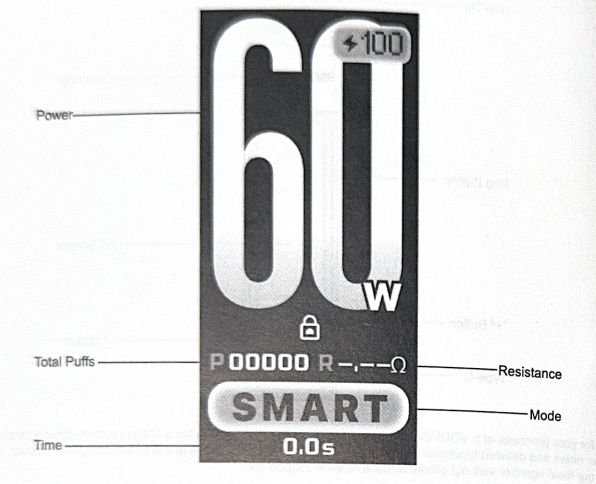
SMART: This mode can identify the best power and prevent the coil from burning due to excessive power while using.
RBA: User-customizable power adjustment from 5 W to 60 W.
ECO: The device enters power-saving mode to save battery life.
5. THEME: Choose the UI (User Interface) theme.
6. ANIMATION: Users can choose whether they want the flame vaping animation.
7. LOCK SETTING: Three ways to unlock.
TOUCH LOCK: Finger touch unlock.
BUTTON LOCK: Press the fire button two times quickly.
UNLOCK: The device is always unlocked.
8. PUFF CLEAR: Puff data will be cleared.
9. EXIT: Exit the main menu.
10. Charging: Support charging with 5V/2A. lt is recommended to use the Type-C cable provided by VOOPOO to charge the device.
11. GENE.TT: The chip supports automatic identification and matching, which intelligently generates and displays data such as battery level, vaping times and duration, output power, and resistance on the screen.
12. Software Upgrading: Consumers have access to upgrade the software to the latest version on VOOPOO official website, which requires the specific Type-C cable equipped with VOOPOO product to connect the computer.
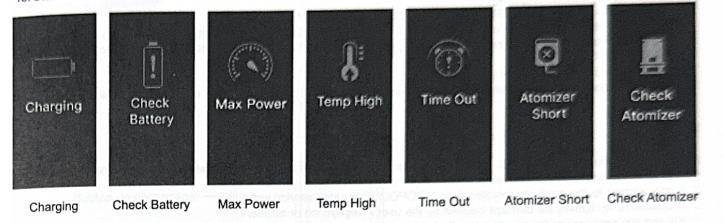
13. Status Notification
Safety Protection

Maintenance and Cleaning
1. When using the device, you may notice occasional liquid condensation on the outside of the cartridge/tank. This occurs because the liquid is vaporized, and as the vapor cools, it condenses on the outer surface, a common and inevitable physical phenomenon.
2. In daily use, you can often use a wet paper towel to wipe the connection between the device and the cartridge/tank to prevent poor connectivity.
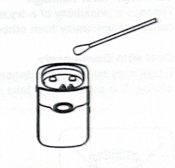
3. lf a small amount of condensate is found inside the device during use, we recommend removing the cartridge/tank, reversing the device, and shaking it for a few seconds.
Precautions for Daily Use of Leather and Wood
1. Please avoid scratches from sharp objects or direct friction with rough surfaces.
2. Please avoid contact with corrosive substances such as acids, bases, or alcohol, as well as alcoholic liquids coming into contact with the leather surface.
3. Use a soft cotton cloth to clean dirt from the leather surface.
4. Avoid prolonged exposure to direct sunlight.
Notes
1. When the product is used with nicotine-containing e-liquids:
·Nicotine is a highly addictive substance. No other ingredients of this product are known to be addictive.
·Nicotine benzoate [828-490-9] Toxic if swallowed. Keep out of reach of children. Wash hands thoroughly after handling.
Do not breathe vapors. IF SWALLOWED: lmmediately call a POlSON CENTER or doctor/physician. lf medical advice is needed, have the product container or label at hand. Dispose of contents/container to designated place in accordance with iocal regulations.
2. This product is not recommended for minors, non-smokers, pregnant or breast-feeding women, or anyone at risk of heart disease,depression, and asthma.
3. Please keep the device away from heat, fire, and water. This device should be stored in a cool and shady environment.
4. Please do not drop, throw, or immerse the device in the water.
5. Please turn off or lock the device to avoid accidental firing when you carry it out.
6. Please rationally use the device according to your personal situation. lf discomfort occurs, please stop using it immediately.
7. EEE Recycling: This product should not be treated as household waste. Instead, it should be taken to the collection place for the recycling of electrical and electronic equipment.
8. Battery Recycling: The product battery should not be treated as household waste. instead, it should be taken to the used battery collection place for recycling.
9. lt is recommended to use the USB cable provided by VOOPOO to charge the device.
10. If the device is not used for an extended period, it is recommended to charge regularly to prevent deep discharge!
11. The ambient temperature ranges from -5℃-30℃, with humidity 40%-75% RH. Operating temperature of the electronic cigarette: 0℃-40℃!
12. Disassembly is prohibited after product failure!
13. Only for indoor charging, please use a UL-certified USB charger to avoid the danger of fire and explosion!
Warm Prompt
Cartridge/Tank Leakage
There is a possibility of e-liquid leakage at high pressure when you travel by air. Therefore, please keep your cartridge/tank away from other important objects
Deal with Condensate
There may be slight condensation due to the difference between indoor and outdoor temperature when you use the device. lt is advisable to take out the cartridge/tank, and shake it downwards.