INSTRUCTIONS
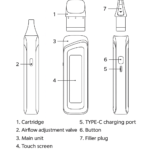
1. General
Charging: After charging, the screen will display the startup animation.
Power On: Press the fire button 5 times within 2 seconds to power on. The device will display the startup animation and enter the standby interface.
Power Off: Press the fire button 5 times within 2 seconds to power off. The device will display the shutdown animation,
Previous Menu: Swipe up to return to the previous screen.
Software Lock: The screen locks after 20 seconds of inactivity. Swipe right to unlock.
A-Lock: Slide the A-Lock switch down to enter the hardware lock state. The screen displays the lock icon, and device is rendered inoperable. Slide the A-Lock switch up to exit the hardware lock state.
2. Power Settings
Mode Selection:
1) Tap the Smart menu option in the main interface to enter Smart Mode.
2) Tap the Power” menu option in the main interface to enter Power Mode.
3) Tap the “Professional” menu option in the main interface to enter the advanced.
Mode-Switching: Swipe the screen left/right within each mode to switch between modes.
3. Control Modes
Smart Mode: The device automatically matches the best output power range based on the resistance value of the atomizer.
1)When the detection resistance is less than or equal to 0.189, the powerregulation range is 70-90W.
2)When the detection resistance is greater than0.18ณ and less than0.25Q,the power adjustmen range is 70-85W.
3)When the detection resistance is greater than or equal to 0.2502 andlessthan 0.400, the power adjustment range is 45-57W.
4)When the detection resistance is greater than or equal to 0.400 the power adjustment range is 50-60W.
The user may adjust the output power within the recommended powering of the coil via the wattage indicator option.
1)Tap the wattage indicator to adjust the power setting Fingerscrolluptoincrease power. Finger-scroll down to decrease power.
2)Tap “OK” to save the adjustment parameters and return to the previous screen.’ Tap Cancel” to return to the previous screen without saving changes
Power Mode:
1)Tap the wattage control indicator to adjust the power setting, from 5-200W. Finger-scroll up to increase power. Finger-scroll down to decrease power.
2)Tap “OK to save the adjustment parameters and return to the previous screen. Tap “Cancel” to return to the previous screen without saving changes.
Professional Mode: Advanced users may fine-tune their vape experience via any of the following options:
TC-SS: This mode is designed to allow the user to set a specific temperature value on a stainless-steel coil at which the e-juice is vaporized. The device will adjust its power output according to the set temperature value so that the coil temperature will remain constant and under control.
1)Tap the temperature control indicator to adjust the power setting. Finger- scroll up to increase temperature. Finger scroll down to decrease temperature.
Temperature range:5F/1℃, 100℃-315℃ to 200F-600F cycle.
2)Degrees Celsius and Fahrenheit automatically switch when they are adjusted to the upper and lower limits of temperature.
3)Tap “OK” to save the adjustment parameters and return to the previous screen. Tap Cancel” to return to the previous screen without saving changes.
TC-TCR: This mode is designed to allow the user to set a specific temperature value on any coil type. The device will adjust its power output according to the set temperature value so that the coil temperature will remain constant and under control.
1) Tap the temperature control indicator to adjust the power setting.
Finger-scroll up to increase temperature. Finger-scroll down to decrease temperature.
Temperature range:5F/1℃,100℃- 315℃ to 200F- -600F cycle.
2) Degrees Celsius and Fahrenheit automatically switch when they are adjusted to the upper and lower limits of temperature.
3) Tap “OK” to save the adjustment parameters and return to the previous screen, Tap Cancel” to return to the previous screen without saving changes.
VPC: This mode enables the user to customize different power levels (wattage)in set increments, providing a power curve over a puff duration (time).
1) Tap the Pl section indicator to adjust the wattage. Finger-scroll up to increase the wattage. Finger- scroll down to decrease wattage. The adjustable power range is 5 200W, in 1W increments.
2) Tap “OK” to save the adjustment parameters and return to the previous screen. Tap “Cancel” to return to the previous screen without saving changes.
3) Repeat steps for P2, P3, P4, and P5 curve adjustment.
BYPASS: Bypass mode delivers power based on the remaining battery life and the resistance of the coil. Effective wattage will be higher when 他和battery is fully charged and lower as the battery depletes. Bypass mode does not have the safety features of the device.
4. Settings Menu
Tap the Setting” option in the main interface to enter the stings menu.
Theme
1) Tap “Theme” to enter the designated interface.
2) Tap the desired device theme option to preview and select. Swipe left and return to the settings menu.
3) Tap “OK” to save the adjustment parameters and return to the previous screen. Press “Cancel” to return to the previous screen without saving changes.
Wallpaper
1) Tap “Wallpaper” to enter the designated interface.
2) Choose the desired wallpaper style by tapping the left and right touch keys. After selecting the wallpaper, slide left to confirm and return to the Settings menu.
3) Tap “OK” to save the adjustment parameters and return to the previous screen. Press Cancel” to return to the previous screen without saving changes.
Brightness
1) Tap “Brightness” to enter the designated interface.
Swipe down to decrease the brightness value. Swipe up to increase the brightness value.
2) Tap “OK” to save the adjustment parameters and return to the previous screen. Press Cancel” to return to the previous screen without saving changes.
Reset
1) Tap Reset” to restore factory settings.
2) Confirm when prompted.
3) Press “Cancel” to return to the previous screen without saving changes.
Puff Clear
1) Tap “Puff Clear” to reset puff counter.
2) Confirm when prompted.
3) Press “Cancel” to return to the previous screen without saving changes.
Version
1) Tap “Version” to display the software version number, company introduction, and additional information.
2) Version information is displayed as follows:
Aegis Xtouch kit
GV20211201 V10
Geekvape’s product team is dedicated to independent innovation and open collaboration and focuses on the conception, design, production, and marketing of vaping. By creating an end-to-end industrial edge in coils,open-system box mod, prefilled products and intelligent production, we’ve established a number of top international vape series like Aegis, z, Sonder, Wenax, Obelisk, and Digiflavor.
3) Swipe up to return to the Settings menu.
5. Atomizer Detection
1) In standby mode, the device will monitor whether the atomizers are replaced, and will update the latest resistance value of the atomizer. Whenever an atomizer is connected to the device, the screen prompts the user to identify whether the atomizer is different from or the same as the one previously attached.
2) Tap “New” to identify the atomizer as one that is new to the device. The device will automatically update the resistance value of the coil.
3) Tap “Old” to identify the atomizer as one being returned to the device. The device will maintain the resistance value reading of the atomizer previously installed.
4) When the original atomizer is removed, the resistance value of the coil will be cleared automatically.
6. Tips and Protection
1) If atomizer resistance <= 0.080, the device indicates a “short circuit for2 seconds. 2) The device requires at least 3.2V of battery power to actually ignite the coil. Once the coil has been ignited, the device requires at least 2.8Vofbattery power to keep the coil heated. In the case of insufficient voltage, vape output will halt. The device will indicate “Low Voltage” for 2 seconds. 3) If the main board temperature is > 65 c before output or> 85C during output, the “Overheating” prompt is displayed for 2 seconds.
4) lf the atomizer is not connected, or the resistance of the atomizeris>=2.20, the device will indicate that there is “No Atomizer” for 2 seconds.
5) If a single vape puff exceeds 10 seconds, vape output will halt, The display will time out for 2 seconds.
6) When the A-lock is engaged or disengaged, the device will indicate locking” or Unlocking for 2 seconds.
7) In the locked state, press the fire button to display the locking status for2 seconds.
This is the end of the article, and thank you for reading!
Related posts