Load battery
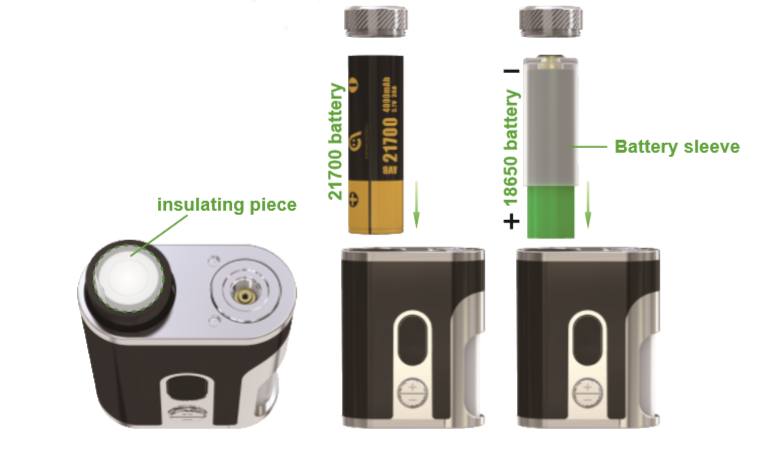
Step 1: remove the insulating piece. (if the package you purchased is the one that includes a 21700 battery)
Step 2: install battery in.
Notice for Use
Thank you for choosing Eleaf products! Please read this manual carefully before use so as to use correctly. If you require additional information or have questions about the product or its use, please consult your local agents, or visit our website at www.eleafworld.com.
For more detailed instructions, please find tutorial video at: www.eleafworld.com/video/.
How to Use pico squeeze 2 mod ?
Power on/off: unscrew the battery cap, and remove the insulating piece that is attached to the negative side of the 21700 battery if the package you purchased is the one that includes a 21700 battery. Then install a high-rate 21700 battery or a high-rate 18650 battery with the battery sleeve into the device and finally screw the battery cap onto the device. The device can be powered on/off by pressing the fire button 5 times.
Note:
1. Please be careful not to use battery with torn casing as it is a safety hazard.
2. Please make sure you are using high-rate 21700/18650 battery whose continuous discharge current is above 25A.
3. Please choose the correct mode and adjust the wattage to a proper range according to your atomizer before use.
E-liquid filling: take off the cover of the e-liquid bottle, pull out the e-liquid bottle, reject e-liquid into the bottle, and finally put the e-liquid bottle and its cover back.
Note:
1. The position of the fill port of the e-liquid bottle is eccentric and biased to one side. Please put the side where the fill port is biased to towards the internal notch of the device so that you can successfully direct the fill port to the silicone plug.
2. If the original silicone bottle needs to be replaced with a new one, please first unscrew the metal cap that is located on the top of the e-liquid bottle, and then you’ll be able to make the replacement.
Vaping: keep holding the fire button to take a puff when the device is powered on. When vaping, the LED will light up in the color you chose or won’t light up if you set LED off.
Note: when using with a Squonk RDA like Eleaf Coral 2, please squeeze the silicone bottle to let the e-liquid go into the coil and cotton, and then you can take a few puffs. Repeat this action to continue
vaping.
Adjustment buttons lock/unlock: keep pressing + button and – button simultaneously for two seconds when the device is powered on to lock or unlock the two adjustment buttons.
Rotate display: keep pressing + button and – button simultaneously for two seconds when the device is powered off, the screen display will rotate 180 degrees.
Charging: the 21700/18650 battery can be charged in the device through USB port via wall adapter or a computer or charged with an external battery charger. If the LED is set to be turned on, the LED on the device lights up for 5 seconds when you plug the device in to charge.
Firmware upgrading: the firmware can be upgraded by connecting the device with a computer through the USB port via a micro USB cable.
General Operations
1. Select vaping mode: when the device is powered on, you’re free to switch the vaping modes among VW, Bypass, TC-Ni, TC-Ti, TC-SS316, TCR-M1, TCR-M2 and TCR-M3 by first pressing the fire button 3 times and then pressing +/- button to choose a mode.
Adjust wattage: in VW mode, the wattage can be adjusted by pressing +/- button. Keep holding +/- button to increase/decrease the wattage rapidly. In TC (Ni, Ti, SS, TCR-M1/M2/M3) mode, first press the fire button 4 times in quick succession and then press +/- button to adjust the wattage.
Adjust temperature: in TC (Ni, Ti, SS, TCR-M1/M2/M3) mode, simply press +/- button to increase/decrease the temperature setting.
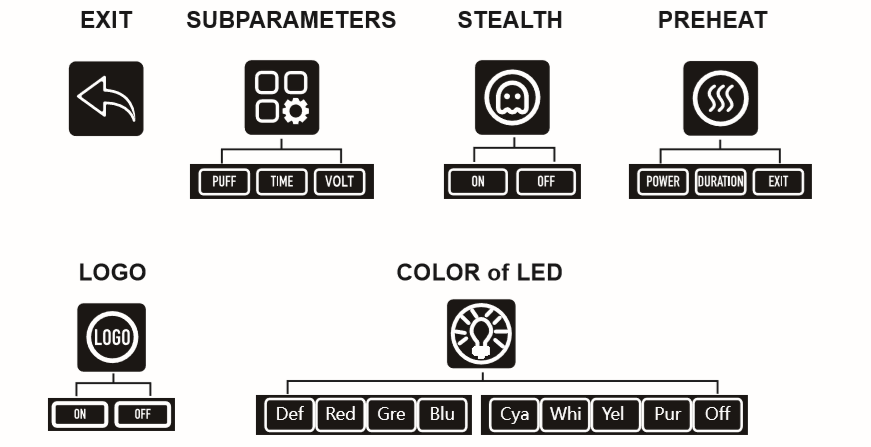
2. Other settings: press the fire button and + button simultaneously to enter set menu, and you’ll be able to lock/unlock coil in TC modes, choose a parameter to be displayed on main interface, set stealth on/off, turn on/off custom logo, choose the color of LED or turn it off, check firmware/hardware version of the device and check battery status, activate/deactivate preheat function in VW mode and set TCR value in TCR (M1/M2/M3) mode simply by pressing +/- button to move or adjust and pressing fire button once to confirm your choice. After settings are complete, just move to EXIT icon and click fire button once to confirm and go back to the main interface.
You can reset the counter of Puff/Time to zero by first moving to the submenu of Puff/Time and then keep holding down the + button.

Warranty
We are not responsible for any damages caused by human error. Legal warranty is applied.
Warnings
1. Please keep out of reach of children.
2. This product is not recommended for use by young people, non-smokers, pregnant or breast-feeding women, or persons who are allergic/sensitive to nicotine.
Contra-indication
1. Do not attempt to repair the product by yourself as damage or personal injury may occur.
2. Do not leave the product in high temperature or damp conditions, otherwise it may be damaged.
3. Do not use this product for other purposes except only for vaping and don’t swallow the e-liquid.
Possible Adverse Effects
1. This product may be hazardous to health and contains nicotine which is addictive.
2. For people with adverse reaction after using this product, it is recommended to use the e-liquid with lower nicotine content or no nicotine.
How to Use Coral 2 Atomizer
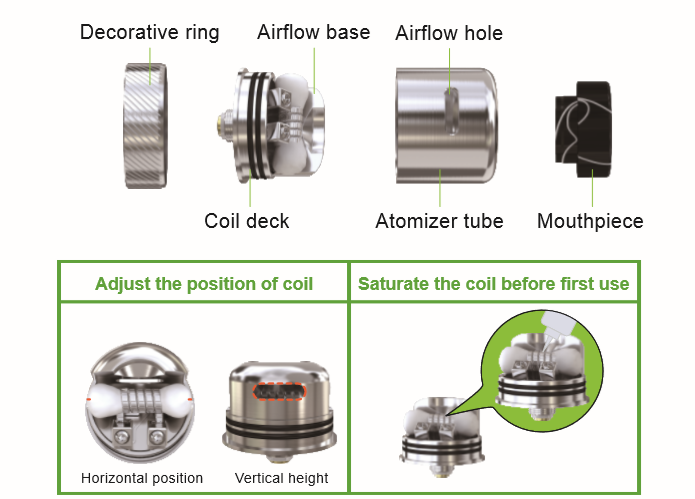
1. Screw the atomizer onto a mod, pull up the atomizer tube to expose the coil deck, and then unscrew the coil deck from the mod;
2. Lift the screw under the airflow base by the help of the screw driver to remove the airflow base so that you’ll get a wide-open space for building coils;
3. Lift the two screws that are located on the posts of the deck by the help of screw driver;
4. Fix the pre-made or self-build coil on the deck, tighten the two screws, put the airflow base back, and finally adjust the position of the coil; (Note: please make sure the finally fixed coil does not come into contact with the surface of the deck, the airflow base and the inner wall of the atomizer tube; please first activate the device to heat the coil till it evenly glows red.)
5. After the coil cools down, pass a piece of cotton through the coil, and trim the cotton;
6. Directly drip a few drops of e-liquid into the coil and cotton to make the coil fully saturated before first use;
7.Assemble all other parts including atomizer tube, mouthpiece and decorative ring together;
8.Finally rotate the atomizer tube to get the optimal airflow you prefer. (Note: to get the most airflow, it is suggested to direct the airflow hole on the atomizer tube to the hole on the airflow base.)
9. When using this atomizer on a Squonk mod, please squeeze the Squonk bottle to let the e-liquid go upwards into the coil and cotton, and then you can take a few puffs. Repeat this action to continue vaping.
Warranty
We are not responsible for any damages caused by human error. Legal warranty is applied.
Warnings
1. Please keep out of reach of children.
2. This product is not recommended for use by young people, non-smokers, pregnant or breast-feeding women, or persons who are allergic/sensitive to nicotine.
Contra-indication
1. Do not attempt to repair the product by yourself as damage or personal injury may occur.
2. Do not leave the product in high temperature or damp conditions, otherwise it may be damaged.
3. Do not use this product for other purposes except only for vaping and don’t swallow the e-liquid.
Possible Adverse Effects
1. This product may be hazardous to health and contains nicotine which is addictive.
2. For people with adverse reaction after using this product, it is recommended to use the e-liquid with lower nicotine content or no nicotine.


