Thank you for choosing IJOY! Please read this manual carefully to ensure
proper use. For additional information regarding this product or its use, please
consult your local UOY retailer or visit our website www.ijoycig.com
Product Introduction:
IJOY Captain PD270 KIT utilizes the 20700 battery platform and has a 234WTC chipset from IWEPAL. The Captain PD270 BOX MOD offers a compact chassis, an intuitive display, a powerful chipset with full TC support, compatible with 18650 batteries, and can accommodate atomizers up to 30mm without overhang. The 20700 batteries were adopted into this industry to replace the 18650 battery.
IJOYCaptain PD270 KIT comes with a Captain sub-ohm tank, which presents an innovative chassis design while introducing a unthreaded coil head for convenient replacement process and a grooved notch design to reduce heat transmission, which provides the best taste.
The IJOY Captain PD270 KIT is an excellent choice for all vapers.
Parameter
1 * IJOY Captain PD270 Box Mod
1 * IJOY Captain SU BOHM Tank
1 * CA2 Coil 0.3ohm (60-BOW Pre-installed) 1 * CA3 Coil 0.25ohm (60-1 OOW)
1 * 18650 Adapter
1* 510 Drip Tip Adapter 1* USB Cable
1 * Manual
1 * Warranty Card
Specifications
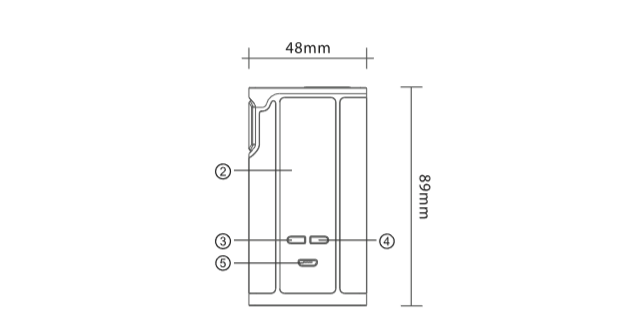
• Screen size: 0.96″0LED.
• Size: 48*32*89mm /1. 88*1 25*3. 50 inches.
• Max Wattage·234W
• Compact and portable
• Bright and big size screen
• Dual 20700 batteries Box Mod(batteries included)
• 18650 battery fit with adapter
• Personalized design, with a unique experience
• NI/TI/SS temperature control
• TCR function
• Unique Custom User Mode
• Resistance Range: 0 05-3 0 ohm
• USB port charging support
• Firmware Upgradeable
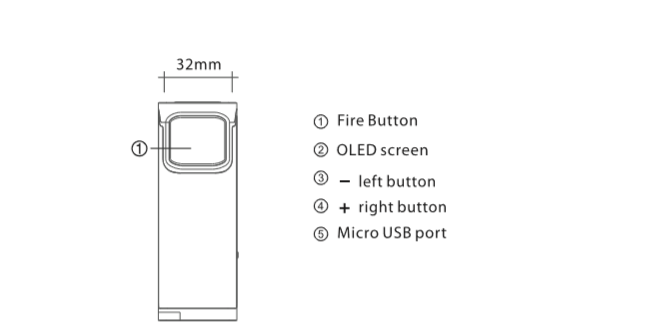
IJOY Captain PD270 Kit Operation Instruction:
1. Power On/off
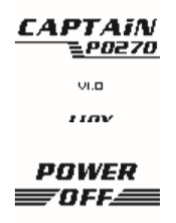
Press the fire button 5 times in quick succession to turn the device on and off. After switch on,OLED display Captain PD270 logo and software version number at stand by mode.
(Note:
Please adjust the wattage to a proper range to match the atomizer you used before using.
2.Vaping
While the device is power on,just keep pressing the fire button to vape
(Firing timeout: 10 Seconds)
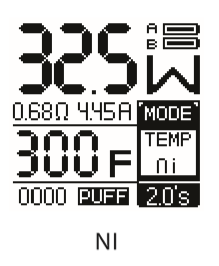
While the device is power on, the OLED screen default display VW Mode.
3. General Functions Enter Into The Main Menu
Press the fire button 3 times to enter into the main menu. Press the right and left regulatory buttons to switch among different functions. Press the fire button to confirm.
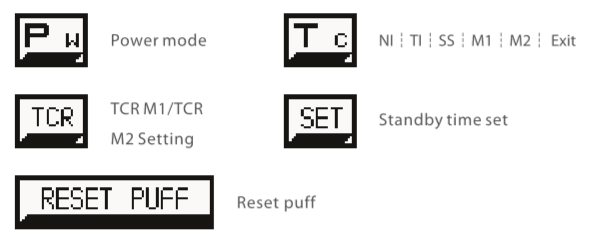
4. Power Mode
In the main menu, switch to”P” setting, press fire button to confirm. Press right and left buttons to ad丿ust the wattage.
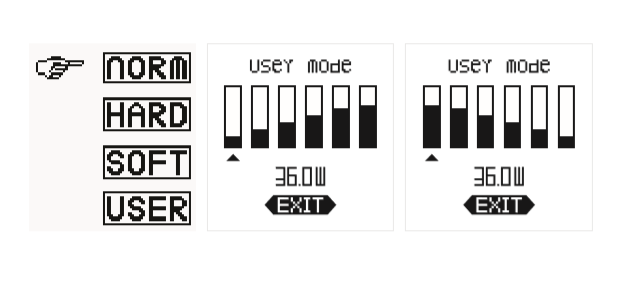
Intensity Setting In Power Mode
In the main menu, switch to intensity setting, press fire button to confirm Press right and left buttons to switch among below4 modes. In user mode, press fire button to switch among each setting columns. Press right and left
buttons to adjust the wattage After setup is completed, press fire button to switch to”EXIT”. Press right or left button to confirm.
Norm Mode: Maintains the currently set power.
Hard Mode: 30% higher than the currently set power.
Soft Mode: 20% lower than the currently set power.
User Mode. Customize the power output for the first three seconds of each puff, with each setting column representing half a second.
5. Temp Mode
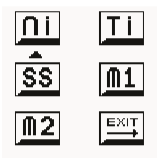
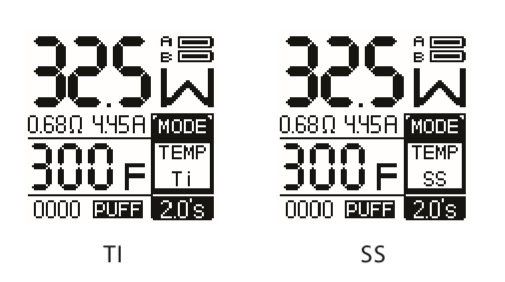
Ni/ Ti /SS/M 1 /M2
In the main menu, switch to·T”setting, press fire button to confirm. Press right and left buttons to switch among Ni/Ti/SS/Ml/M2 modes. Press fire button to confirm. Press right button, when “W”flashing, press right and left buttons to ad丿ust wattage. Press left button, when”°F” or”0C”flashing, press right and left buttons to ad丿ust temperature value.
The temperature unit will cycle between ° F and °C when the minimum or maximum temperature is reached.
In the temperature control mode to replace
the heating wire, when the new heating wire resistance and the previous heating wire resistance difference greater than or equal to 0.2ohm, the screen appears the following tips. Press+ to choose and confirm new coil. Press -to choose and confirm same coil.

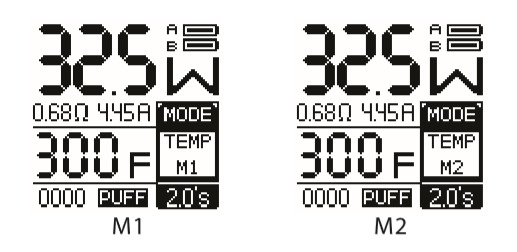
6. TCR Mode (M1, M2)
With the TCR (Temperature Coefficient of Resistance) function available now, you can customize your temperature control coils(Ni, Ti, 55) on your own. In the main menu, switch to’T” setting, press fire button to confirm. 5witch to Ml/M2 modes. Press fire button to confirm.
How to set the TCR?
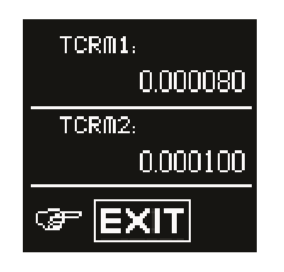
In the main menu, switch to·TcR·mode indication, press fire button to confirm. Press fire button to choose between TCR M 1, TCR M2. Press right/left buttons to select certain parameter. After setup is completed, press fire button to switch to·EXIT”. Press right or left button to confirm
7. Puff counter
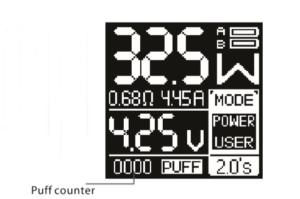
In any mode, the screen shows the number of puffs. If a puff more than 0.8s, it will be recorded as one puff. The device can remember the value even if you remove the battery. The default number is”0000”. When the number reaches”9999′; it will be cleared automatically.
9. Set the standby mode
Press the fire button 3 times in 2s to enter the menu,  choose , there are 4 preset choices, press fire button to confirm your choice, the screen ewill enter standby mode at the selected time.
10. How to calibrate the resistance?
When the device connected with a new atomizer, press+ and – button at the same time to calibrate the initial resistance of the new atomizer.
We recommend to calibrate resistance in temperature control mode , you can make the temperature control more accurate, please note that this operation requires heating wire cooling to room temperature.
11. Upgrade operation
When the device can work properly, remove the atomizer, and then release the battery cover to let the device out of power, do not need to remove the batteries, keep the batteries inside the device, and then press the fire button, re-install the battery cover, At this time the device is in black screen situation, open the upgrade software, connect the device to the computer through the USB cable , upgrade software will find the device, select the new firmware which downloaded from the Internet, and then click Update to update the firmware. When the program prompts the upgrade is successful, unplug the USB cable, Release the battery cover to power off the device, and then install the battery cover, the upgrade is completed.
12. How to charge by USB?
When the voltage is lower than 3.3V, the display will show”Low Battery’; then you need to charge the device, please connect the device through the USB cable to the computer or power adapter.
1, in the charging process, The battery energy column indicator will scrolling,
when fully charged , it will stop scrolling.
2, in the charging process, the battery voltage is lower than 3.2V, the device
is turned off.
3, can not vape during charging
(If the device not be used for a long time, please charge every 30
to 60 days to make sure battery life.)
13.Malfunction
Indication and Protection
PCB temperature overheat protection When the temperature of device is too high, the output will shut off automatically and the screen will display”PCBTOO HOT”
Low power alert:
When battery voltage is below 3.2V, the device shows” LOW BATTERY”
PCB Atomizer short-
circuit protection:
When atomizer short-circuit occurs, the OLEO screen will d1splay”SHORTED”
No Atomizer:
when no atomizer connect, the device will display”No atomizer”
Low resistance protection: When the resistance is I owe『than 0.06ohm, the OLED screen
will display”OHMS TOO LOW”.
When the resistance is higher than 3ohm, the OLED screen will display”OHMSTOO HIGH”.
Warnings
1. Please read the manual carefully before use
2. Please do not keep the ejuice inside the atomizer if the device is not going to be used for a long period
3. Please take out of the battery from device when it’s not used for a long time
4. Please keep the device away from children,pregnant women,and minors
(under 18 years of age)