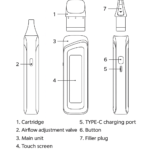
Illstration
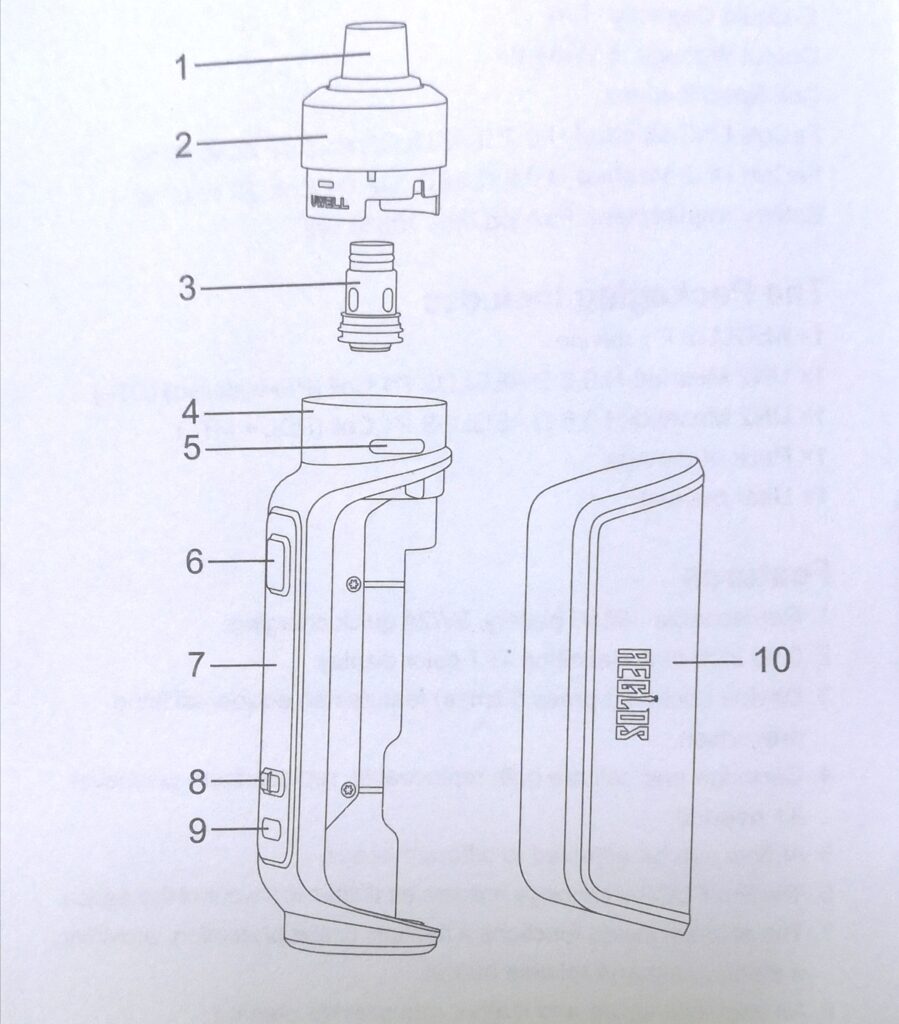
- Drip tip 2. E-liquid container
3. Coil 4. Device
5. Airflow inlet 6. Fire button
7. Display screen 8. Navigation buttons
9. Type-C charging port 10.Battery cover
Qick Guide
- Please use premium 18650 lithium batteries (sold separately).
- Allow the coil to soak for 10 minutes after filing
- To turn on/off the device, click the fire button 5 times within 2seconds.
Instructions
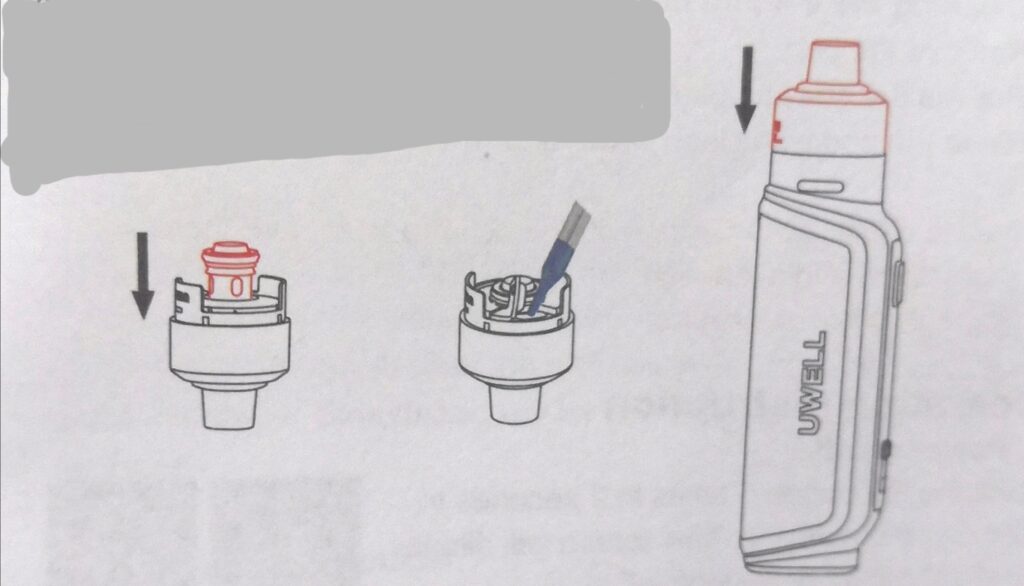
1. Filing the pod
a. Insert the coil,
b. Open the silicon lid.
c. Fill the pod with e-liquid.
d. Secure the lid.
e. Plug the pod in the device.
Attention:
a. Make sure the coil is in place when inserting.
b. Reach inside the container with e-juice bottle nozzle when filing.
c. Do not leave the filled pod open, secure the lid to prevent leakage.
d. To avoid dry-burning, please wait for 10 minutes after the first-juice top-up.
e. Please refill immediately when e-juice level reaches the refill mark.
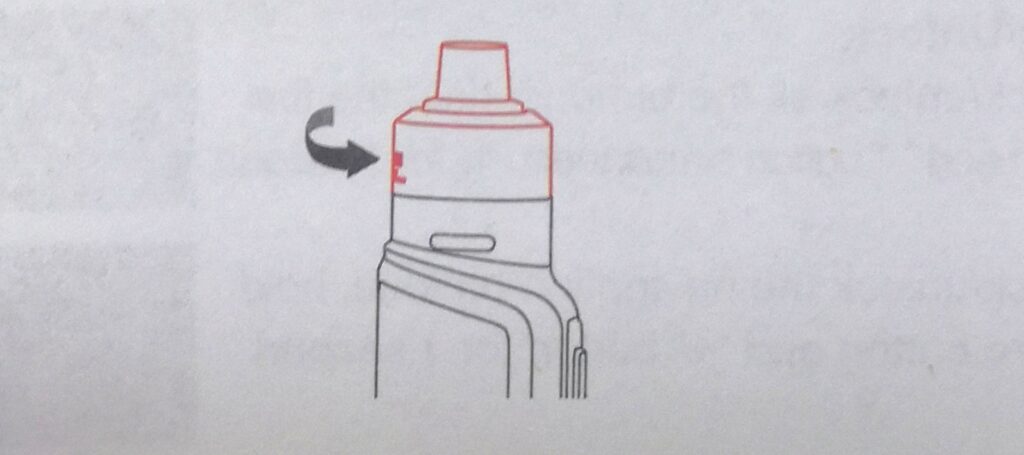
2. Airflow adjustment
Airflow is adjustable, rotate the pod to adjust.
3. Replacing coil.
a. Remove the pod.
b, Pull out the coil.
c. Replace with a new coil.
Attention
a. After filling the e-liquid, please let the pod sit for 10 minutes to avoid coil burning.
b. Please check if the O-rings on the coil are intact and installed correctly to avoid leakage.
4. Cleaning the e-liquid tank
a. Remove the pod.
b. Pull out the coil and place it where is dry and cool,
c. Rinse the pod with clean water and re-use it after it is dry.
Note:
a. please check if the O-rings on the coil are intact and installed correctly to avoid leakage.
b. The coil is not re-usable.
Operation instruction
1. Power on/off
Click the fire button 5 times in 2 seconds to turn on/off the device. The screen will display “Hello UWELL” or “Goodbye!”
2. Standby
Device will switch to standby mode after 60seconds without any operation.
3. Vaping time
Device will display the warning “OVER 10Sr” and ceased operation in the case of the fire button is pressed for over 10 seconds.
4. Lock/Unlock
To lock/unlock all the buttons. hold the fire button and”- button simultaneously for 1 second.
b. To lock/unlock the navigation buttons, hold the fire button and *+” button for 1 second.
5. Wattage adjustment
Press “+”and “.” to adjust wattage output, hold to fast adjust. Single press to loop between highest and lowest when output is set to either highest or lowest.
The recommended wattage range of the 0.2a coil is 45-52W. The recommended wattage range of the 0.6Q coil is 23-27W
Attention: The device will automatically adjust the output when the battery is low and display the actual current wattage instead of the set wattage.
6. Puff counter
Puff counter will record puff which lasts over1 second, puff which lasts less than 1 second will not be recorded; to clear the puff counters, press “+” and “-” Simultaneously for 2 seconds.
7. Resistance detection
Resistance detection of the pod would be done automatically, Detection ranges from0.20 to 30.
a. “No Atomizer” sign will be displayed whenthe device is fired without a coil or the coilresistance is beyond detection range.
b. “Atomizer short” sign will be displayedwhen the device is fired with coil of a resistance underneath the detection range.
8. Low power protection
“Low Battery!” sign will be displayed when the device is fired with a low battery.
9. Over-temperature protection
“Too Hot! Please Wait” sign will be displayed when the device’s internal temperature exceeds 80C during use, and the device will cease working within the next 10 seconds.
10. Charging
“Charging” sign will be displayed during charging. Charging requires a 5V/2A adapter and Type-C cable. (Type-C cable is available separately.)
11. Factory reset
Press the fire button, “+” button and“-” button simultaneously for 1 second to reset the device to factory setting. “Factory Reset” sign will be displayed after resetting is done and the device will be set to factory setting.
Deal: ☟ Grab 39%OFF after applying code “AEP1“.
Related posts