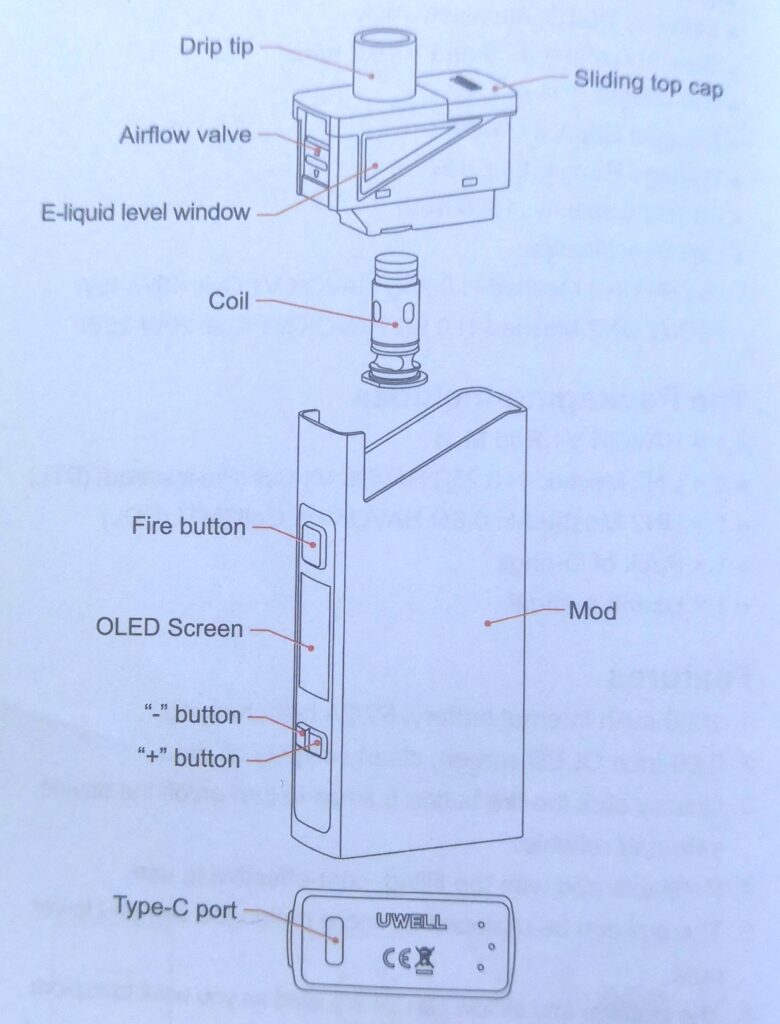
Illustration
Please read the following information before use:
1. Install the coil into the pod to ensure that the bottom of the coil is flush with the bottom of the pod.
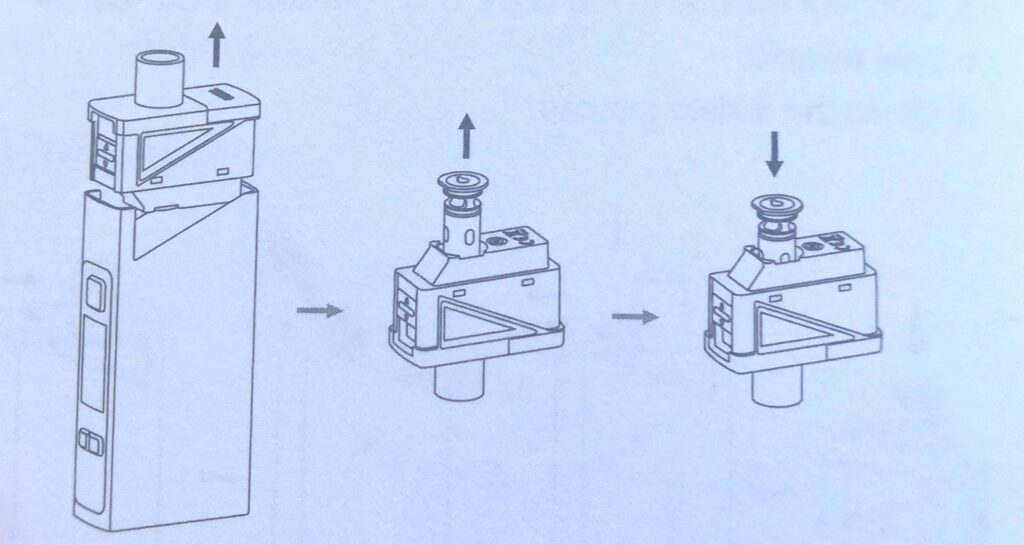
2. Connect the pod to the body and slide the sliding top cap off.
3. After adding e-liquid from the filling hole, close the sliding top cap and let it stand for 10 minutes.
4. Press the fire button 5 times to turn it on, hold the fire button to vape.
Instructions
1. How to fill the pod
a. Install the coll into the pod.
b. Connect the pod to the body, Slide the sliding top cap off.
c. Add e-liquid.
d. Close the sliding top cap,

Attention:
a. Please make sure the bottom of the coil is flush with the bottom of the pod when installing the coil,
b. Please insert the nib of the E-liquid bottle into the pod to refill it
c. Do not open the sliding top cap for an extended period. Close the sliding top cap securely after rifling to prevent leakage.
d. When filing a new pod, please let the pod sit for 10 minutes to avoid coil burning.
e. Please add e-liquid when the e-liquid level is at the “MIN” line.
2. Vaping
Please adjust the aiflow valve to your desired aiflow at frstWhen the device is on, hold the button to vape, the screen willstay on.
3. Changing the coil
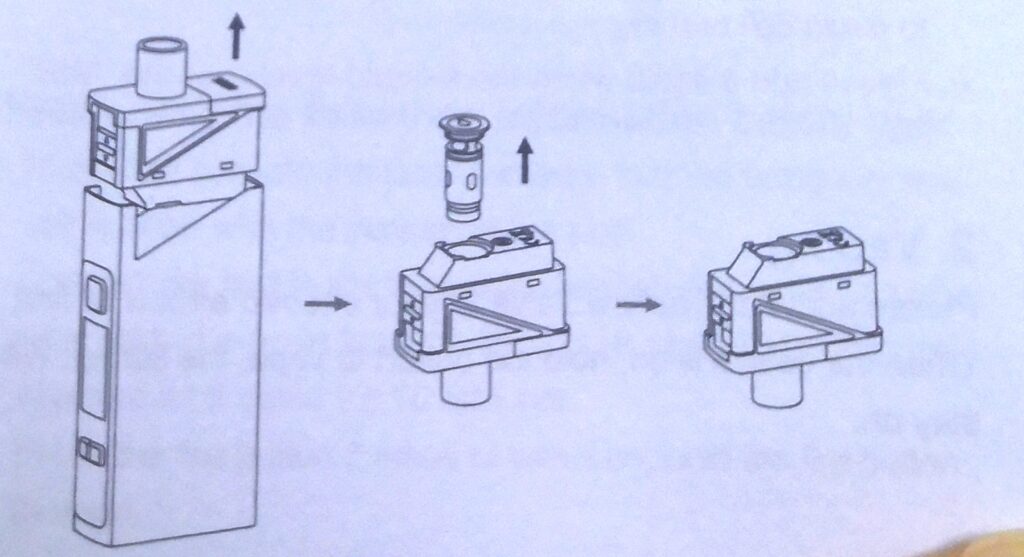
a. Remove the pod from the device.
b. Remove the used coil from the pod.
c. Install a new coil.
Attention:
1. Please let it sit for 10 minutes after the first filing to avoid burning the coil.
2. Please have a check if the O-rings on the coil are intact when installing to avoid leakage.
4. How to clean the pod
a. Remove the pod from the body.
b. Remove the coil from the pod. Do not clean the coil.
c. Clean the pod with clean water and dry it before use.
- Please have a check if the O-rings on the coil are intact when installing to avoid leakage.
Mod instructions
1. Power on/off
Click the fire button 5 times within 2 seconds to turn on/off the mod. It will display “Hello UWELL” when it’s on and display “Goodbye” when it’s off.
2. Standby
When there is no operation in 8 seconds, the screen will turn off and will be in stand-by.
3. Vaping
While the device is on, hold the fire button to vape; it will display “OVER 8S” and automatically stop firing when the button is held for longer than 8s.
4. How to lock your device
a. When the device is on, hold the fire button and “- button for 1 second to lock/unlock the device.
b. When the device is on, hold the fire button and “+” button for 1 second to lock/unlock the “+/-” buttons.
5. Wattage setting
a. When the device is on standby, press the “+/-“to adjust the wattage or hold the button to scroll through them faster, When it reaches the end of the range, it will round-robin.
b. The wattage range for the 0.25-ohm coil is40-45W; the wattage range for the 0.6-ohm coil is 20-25W.
Attention
The output voltage will decrease gradually during vaping. When the output wattage can not reach the set wattage, the device will lower the wattage automatically and then the screen will display the output voltage after automatically adjusting the wattage.
6. Puff counter
Every vape lasting longer than 1 second would be counted as 1 puff. The vape is shorter than 1 second won’t be counted. The maximum record is 9,999 puffs. Hold the “+ and “-” buttons for2seconds until “PUFF CLEAR” is displayed. After releasing the buttons, the number of puffs is cleared.
7. Resistance detectíon
Resistance detection shall be done automatically. Resistance range is 0.2 – 3ohm;
a. If there is no pod or the resistance of the coil is too high, press the fire button the screen will indicate an open circuit.
b. If the resistance of the coil is too low, press the fire button the screen will indicate short circuit.
8. Low power indication
When the voltage is too low, press the fire button the screen will indicate low battery.
9. Temperature protection
The output will be cut off if the PCBA temperature increase to80″C during vaping, the screen will display “Too Hot! PleaseWait”; 10 seconds later the temperature will stop and you are free to vape again.
10. Charging
Charge battery with Type-C of 5V/2A, the screenwill indicate charging.
11. Factory reset
Hold the fire button, “+” and “-” button for 3 seconds the screen will display “Factory Reset”, release the buttons the screen will exit to the defaulted wattage, and the puff counter would be cleared.
Related posts