Notice for Use:
Thank you for choosing Joyetech. Please read this manual carefully before use lo ensure that your usage is correct If you require any additional information or have any questions about the product or its use, please consult your local Joyetech agent, or visit our website at www.joyetech.com.
Product Introduction:
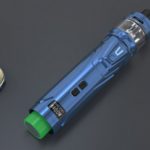
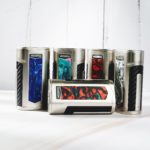
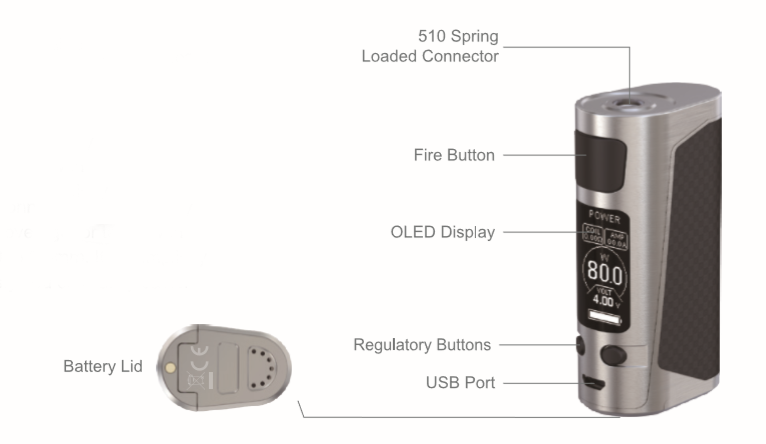
Having a large 1.3 inch OLED display and a new easy-to-go interface, the eVic Primo Mini is a compact starter mod available in multiple attractive colors. It makes no sacrifice to power or functions compared to its predecessors. The eVic Primo Mini reaches a formidable 80W power along with a sequence of unique features including 2A quick charge, clock, custom logo and preheat. Spring loaded 510 connector was precisely designed which has a wide coverage for tanks with various pins ranged from 4.0 to 5.5mm. It’s simplicity and modesty will surely satisfy you on a daily basis.
Parameter:
Output range: 1-80W
Output modes: Power/Bypass/Start/Temp(Ni, Ti, SS316)/TCR(M1, M2, M3)
Resistance range: 0.05-1.Sohm for Temp/TCR mode
0.1-3.Sohm for Power/Start/Bypass mode
Temperature control: 100-315 C/ 200-600 F
Depth of 510 pins applicable: 4.0-5.5mm
Battery: high-rate 18650 cell (continues discharge current≥25A)
Max charging current: 2.0A
Max output current: 25A
How to use:
1. Power on/off:
Put the device upside down. Press and push the battery cover to open the lid. Put one 18650 battery inside and push the cover back. Press the fire button 5 times in quick succession to tum the device on or off.
Note: 1. Please always use high rate 18650 cells with continuous discharge current (CDC)≥25A
2. Please pay attention to the positive and negative signs when installing the cells.
3. Do NOT use cells with tom casings for safety reasons.
2. Vaping
Hold the fire button and inhale through the mouthpiece. Release the fire button and exhale. Please choose the correct mode and adjust the wattage to a proper range according to your atomizer before use.
3. Charging & Upgrading
The eVic Primo Mini adopts new balanced charging system which supports quick charge capability with max charging current up to 2.0A. You can also take out the cell and charge it in a stand alone charger. The USB port is placed on the down end. Download the latest firmware at www.joyetech.com/mvr-software/ and connect it with a micro USB cable to upgrade.
General Setting:
Switch the mode
Press the fire button 3 times to enter into the mode options. Then press “+” / “-” button to switch between Power/Bypass/Start/Clock/TEMP(Ni, Ti, SS316)/ TCR(M1, M2, M3) modes. Press the firm button to confirm.
Note: The TEMP-SS316 mode is especially designed for stainless steel 316 type coil only.
Parameter Settings
Under Temp/TCR mode, you’re able to adjust temperature by pressing “+” / “-” button directly.
Press the fire button 4 times and press “+” button thus you can adjust the wattage.
Press the fire button 4 times then press “-” button you can lock/unlock the resistance by pressing “+” button,
Continue to press “-” button then you can choose to display current. Puff time and puff counts by pressing “+” button.
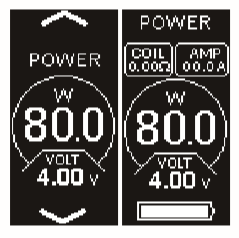
Under VW mode, you’re able to adjust the wattage by pressing “+”/ “-” buttons directly.
Press the fire button 4 times then you can choose to display current, puff counts and puff time by pressing “+” button.
1. TEMP/TCR mode only supports a maximum of 1.5ohm. The device will automatically switch to VW mode when the resistance is larger than 1.5ohm.
2. When Kanthal wire is applied under Temp/TCR mode, the device will also automatically switch to VW mode.
New coil, same coil
When replacing the atomizer, whose resistance is larger than the previous one to some degree, resetting of the atomizer “base resistance” is required. It should be used at room temperature.
When the atomizer is detached, long press the fire button to initiate a reset. After fitting a new coil and reinstall the atomizer, ‘New Coil, Same Coil’ message will appear on display. Press’+” button to confirm that a new coil has been fitted. Should you see the message accidentally for any other reason – especially when reinstalling the same coil that is still warm after use – press”-” button so that the “base resistance” will remain the same. Always do
remember to choose proper mode and settings to fit the coil
Set TCR value
With the TCR (Temperature Coefficient of Resistance) function, you can customize your temperature control coils (Ni, Ti, SS) on your own
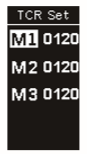
When the device is off, press the fire button and’十” button simultaneously for about 5 seconds to enter into the TCR setting menu:
1. Press”+” button to switch between TCR M1, M2 and M3;
2. Press”-”button once first, then set the value with the”-“/’+” buttons;
3. Long press the fire button or leave it for a few seconds to confirm.
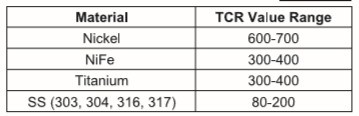
TCR value range for normal temperature control coils: Note:
1. The above TCR value is 105 multiplied of its actual value.
2. Value range is among 1-1000.
Real-time-clock
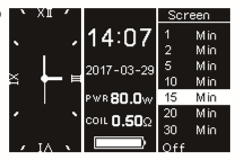
The eVic Primo Mini comes with real-time-clock function. And it is displayed in two ways: digital clock and analog clock.
Press the fire button 3 times and switch the modes by pressing “+” button.
Seiect the clock mode. Press the fire button 4 times and you can choose to display digital clock or analog lock.
Under digital clock, press the fire button 4 times and then press “-” button to select time and date. When it is flashing, press “+” button first and then you’re able to adjust by pressing “-” / “+” button.
Set screen protection
When the device is on, simultaneously hold the fire button and “+” button. Press “-” button to set the screen protection duration. Press the fire button to confirm. The screen will display analog clock in standby
General Function

Stealth function

When the device is on, simultaneously hold the fire button and “-” button to turn on/off the stealth function. When it is under stealth, you can still vape with the display off.
Key Lock Function
When the device is on, simultaneously press “-” and “+” buttons to turn on/off the button lock function.
When Key Lock is on, regulatory buttons will not work to prevent accidental adjustments. Still, you can vape while it is under key lock
Switch the display
When the device is off, simultaneously press ” – ” and “十” buttons to turn the display upside down. Redo it to switch the display back.
Custom logo
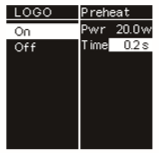

Press the fire button and “+” button simultaneously to enter into the setting menu. Continue to press button and you’ II enter into the Logo Mode. Simply choose on/off by pressing button. Press the fire button to confirm Use the VT software for eVic Primo Mini to upload your logos (It should be single color bmp. picture with 64*40 pixel)
Preheat function
Simply long press the fire button and “十” regulate button simultaneously to enter into the regulation interface. Then press “十” button 2 times to enter into Preheat Setting Menu.
Press” -” button first then press the fire button to switch between preheat power and duration. Press ”十”or ” -” buttons to regulate. Long press the fire button to confirm.
Indication and protection
Over 10 Second Protection:
When the fire button is pressed for over than 10 seconds, the power will shut off and the screen will display Over 10s protection.
Atomizer Short-Protection:
When atomizer short-circuit occurs, the screen will display Atomizer Short.
No Atomizer Alert:

When you press the fire button and screen displays No Atomizer Found. That mainly because there’s no atomizer attached on the battery it is not tightly secured.
Week Battery Alert:
When the device is working with the atomizer when the battery voltage is under 2.9V, the screen will display Week Battery. Meanwhile, output power will be reduced accordingly.
Low Power Alert:
When the battery voltage is under 3.3V, the screen will show Battery Low.
If you continue to press the fire button, it will show battery low lock, then stop working..
Please recharge the battery to reactivate. As soon as charging has commenced low-voltage protection will unlocked.
Atomizer Low Alert:
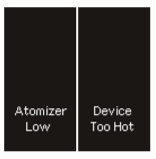
When the resistance is lower than 0.1ohm under VW mode (or<0.05ohm under TC/TCR mode), the screen will display Atomizer Low.
Temperature Protection:
Under TC/TCR mode, when the actual coil temperature reaches to the set temperature, the screen will show Protect.
Device Too Hot Alert:
When the temperature of device is higher than 70℃, output will shut off automatically and display Device Too Hot.
Charge Error Alert:
if the device detects no charging current while plugged into the charger, the screen will show “Charge Error”.
Check Battery Alert:
When the device is power on and plugged into the charger, if the cells are not inside or accidentally placed opposite, the screen will show “Check Battery”.
Check USB Adapter Alert:
if the voltage of the adapter is 5.8V or higher, the screen will appear “Check USB Adapter” when plugged into the charger or pressing the fire button.
Battery using:
1. Please use correct charging equipment by reputable suppliers.
2. Please put the batteries on a hard surface when charging.
3. Please turn off the device when it is not in use.
4. Don’t leave the charging batteries unattended.
5. Don’t expose the battery to extreme heat, cold, or direct sunlight.
6. Keep away from water or any liquids.
Precautions:
1. Don’t use the device in stormy weather or dust condition.
2. Connect the USB port and charger properly. Unplug the charger when the charging is completed.
3. Don’t put the device in your pocket or handbag directly; don’t mix it with coins, jewelry or other hard objects.
4. The charger and battery may heat when charging, keep away from flammable gas, liquid or other materials.
Warning:
1. Keep out of reach of children
2. This device is not recommended for use by people under 18 or non-smoking.
3. This device is not suitable for use by pregnant or breast-feeding women.
4. This device is not suitable for use by who’re allergic or sensitive to nicotine or those who can’t use nicotine product for health reasons.
Attention:
1. Only have your device repaired by Joyetech. Do not attempt to repair the unit by yourself as damage or personal injury may occur,
2. Do not leave the device in high temperatures or damp conditions, as this may damage the device. The appropriate operation temperature is within 0℃ to 45℃ while charging and -10℃ to 60℃ while in use.
3. Do not attempt to combine the device with parts of other brands of e-cigarettes. Joyetech will not make responsibility and your warranty will be void if any damage caused by this way.
Warranty terms:
Please refer to your Joyetech product warranty card. We are not responsible for any damage caused by user error. Our warranty is not valid for products purchased from third party vendors.
Joyrtech agree to provide repair under warranty pursuant to the following terms and conditions:
1. This warranty provides repair free of charge for defective Joyetech band merchandise. Warranty period is 90 days from date of purchase by the end user.
2. This warranty may be void as a result of any of the following conditions:
Customer does not provide warranty card and original receipt of purchase.
Merchandise failure or damage id caused due to improper use or unauthorized repair.
Merchandise failure or damage as a result of excessive force such as dropping.
Merchandise failure or damage as a result of usage outside of recommended operating conditions (see precautions in usage manual).
Merchandise failure or damage caused by improper use of water or other e-liquid(see usage manual for operating instruction)
Merchandise failure or damage due to usage with non-Joyetech components (charger, battery, and power cable).
3. This warranty does not cover personal items or consumable goods and attachments, including but not limited to : cartridge, atomizer head, lanyard, and leather sheath.
4. This warranty does not cover any non-Joyetech brand products. This warranty is only valid for eligible Joyetech brand products during the warranty period of 90 days after purchase as indicated on proof of purchase.
Joyrtech reserves the right of final decision in all warranty cases. Joyetech may interpret and revise the content of this warranty terms.
Related posts