Notice for Use
Thank you for choosing Eleaf products! Please read this manual carefully before use so as to use correctly. If you require additional information or have questions about the product or its use, please consult your local agents, or visit our website at www.eleafworld.com
 Product Introduction
 Product Introduction
The iStick Pico 25 ingeniously packs a big 0.91-inch screen that offers a concise and clear interface, 2A quick charge capability and upgradeable firmware with preheat function in a compact, stylish yet powerful package. Powered by single 18650 battery, the iStick Pico 25 is capable of outputting a maximum power of 85W and can handle various tanks up to 25mm diameter. The ELLO atomizer that features the HW coil for ultimate flavor and retractable top for easy filling pairs with the iStick Pico 25 perfectly in terms of both appearance and performance.
How to Use iStick Pico 25?
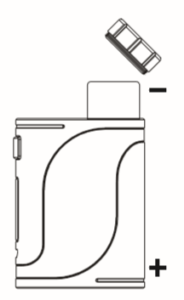
Power on/off:
screw off the battery cap, put one high-rate 18650 battery (positive side down and negative side up) into iStick Pico 25 and finally screw the battery cap on. The device can be powered on/off by pressing the fire button 5 times.
Note:
1.Please be careful not to use battery with torn casing as it is a safety hazard.
2.Please make sure you are using high-rate 18650 battery whose continuous discharge current is above 25A.
3.Before using, please set the wattage within a proper range that the atomizer you installed can work with.
Vaping:
when the device is powered on, long press the fire button to take a puff.
Stealth on/off:
press the fire button and “-” button simultaneously when the device is powered on to switch between Stealth On and Stealth Off mode. In Stealth On mode, you can vape with the OLED screen off and you can press the fire button once to see current setting.
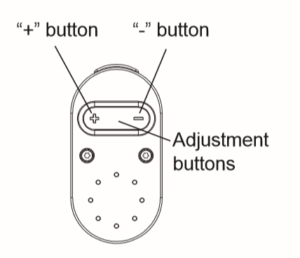
Adjustment buttons lock/unlock:
keep pressing “+” button and “-” button simultaneously for two seconds when the device is powered on, then the adjustment buttons will be locked and the screen will display “Key Lock”. In the same way, the adjustment buttons can be unlocked and the screen will display “Key Unlock”. Through this operation, you can protect the buttons from unintentional presses and prolong their lifespan.
Switch display mode:
keep pressing “+” button and “-” button simultaneously for two seconds when the device is powered off, the screen display will rotate 180 degrees. You can view the screen from two different angles through this operation.
Switch display interfaces:
in power-on state, choose VW mode; keep holding “+” button and fire button till the current interface flashes; when it’s flashing, press “+”or “-” button to switch among different interfaces; finally press fire button once to confirm the interface you chose.
Note:
the interface can only be changed and selected under VW mode in power-on state. And when one interface is selected under VW mode, the interfaces of Bypass /TC (Ni, Ti, SS, M1, M2, M3) modes will change accordingly and automatically.
Preheat function:
in power-off state, keep holding “+” button and fire button till the M1mode appears; press the fire button 3 times to “Power”, and press “+” or “-” button to adjust the wattage of preheat; press the fire button again to “Time”, and press “+” or “-” button to adjust the second of preheat or to turn off the preheat function.
Switch vaping modes:
when the device is powered on, press the fire button 3 times in quick succession, the device will display current vaping mode. Press the “+” or “-” button to switch among VW, Bypass,TC-Ni, TC-Ti, TC-SS, TCR-M1, TCR-M2, TCR-M3 modes and then press the fire button once or stay in the interface for about 10 seconds to confirm the vaping mode you chose.
1) VW mode:
When set in VW mode, the device can support a coil whose resistance is within the range of 0.1ohm-3.5ohm. Adjust wattage: in this mode, the output wattage can be adjusted from 1W to 85W by pressing “+” button or “-” button, “+” button to increase and “-” button to decrease. Long press “+” or “-” button can rapidly increase or decrease the wattage level.
2) Bypass mode:
When set in Bypass mode, the device can support a coil whose resistance is within the range of 0.1ohm-3.5ohm. Direct output voltage system is applied in this mode. The higher the battery level, the higher the output voltage.
3) TC-Ni/TC-Ti/TC-SS/TCR(M1, M2, M3) Mode:
When set in TC-Ni/TC-Ti/TC-SS mode, the device can separately support Nickel 200, Titanium, and Stainless Steel 316 coils. In TCR (Temperature Coefficient of Resistance) mode, the device can support different temperature control coils within different TCR value ranges and you can set the TCR at different values within proper range. (Resistance range of coil: 0.05ohm-1.5ohm)
The Setting of TCR Mode (M1,M2,M3):
when the device is powered off, keep pressing the fire button and the “+” button simultaneously, then you will enter into the TCR (M1,M2,M3) set menu:
1. Press the fire button repeatedly to choose among M1, M2 and M3 modes;
2. Press the “+” or “-” button to increase or decrease the TCR value according to the material of the coil you use;
3. Keep pressing the fire button or stay in the interface for about 10 seconds to confirm your setting.
Following are different TCR value ranges for different coils for your reference:

Note:
1.The TCR value in the sheet is 10 multiplied of the actual TCR.
2.Our total range of TCR value is 1-1000.
Adjust wattage:
in TC-Ni/TC-Ti/TC-SS/TCR(M1,M2,M3) mode, the output wattage can be adjusted from 1W to 85W. Press the fire button 4 times in quick succession to enter the wattage setting menu and press “+” or “-” button to increase or decrease the wattage level. Keep pressing “+” or “-” button without looseness to rapidly increase or decrease the wattage level.
Adjust temperature:
in TC-Ni/TC-Ti/TC-SS/TCR(M1,M2,M3) mode, temperature can be adjusted from 100-315℃ or 220-600℉ by pressing “+” or “-” button, “+” button to increase and “-” button to decrease. Each press of the “+” or “-” button will increase or decrease the temperature setting by 5℃ or 10℉. Keep pressing “+” or “-” button without looseness can rapidly increase or decrease temperature setting.
Shift between ℃ and ℉:
if you increase the temperature to 315 ℃, and continue to press the “+” button, the temperature reading will automatically change to the lowest Fahrenheit (220℉). Equally, if the temperature is set at the lowest Fahrenheit (220℉) and you continue to press the “-” button, the temperature reading will automatically change to the highest Celsius (315 ℃).
Lock/Unlock resistance:
in TC-Ni/TC-Ti/TC-SS/TCR(M1,M2,M3) mode, when the device is powered on, keep pressing the fire button and “+” button simultaneously for two seconds to lock or unlock atomizer “base resistance”. The lock sign will appear when resistance is locked and “Ω” symbol will come back when unlocked.
Note:
1.Please lock the resistance when the coil is at room temperature so that the device can display the correct “base resistance”.
2. In resistance lock mode, when you remove the coil and then put it back, the device can maintain the same “base resistance” although the coil resistance may increase due to the rise of temperature. In resistance unlock mode, when you remove the coil and then put a coil back, the screen may display “New coil up same down” as the coil resistance may increase within certain range. If it is the same coil, press the “-” button and if it is a new coil, press the “+” button. But please unlock the resistance when you want to change an atomizer or a coil of different resistance.
3. When using a common coil or a coil whose resistance is above 1.5ohm in TC-Ni/TC-Ti/TC-SS/TCR(M1,M2,M3) mode by mistake, the device will automatically switch back to VW mode.
How to put custom logo in the device?
Download the file on our official website, plug the device in with USB cable to a computer, and double click the EleafUpdate.exe. Then click “LOGO” and open the image you choose to put it in the device. Finally press the fire button twice in quick succession when the device is powered on to enter logo on/off interface and press “+” button or “-” button once to turn on/off logo.
Note:
1. Please make sure the image you choose is a monochrome image of 96*32 pixels in the format of bmp.
2. If you fail to put the custom logo in and the device shuts down, press the “-” button once to restart the device.
Functions of Micro USB Port
Charging:
The battery power indicator on the screen of the device will keep flashing when the remaining power of the 18650 battery is less than 10%. The 18650 battery can be charged in the device through USB port via wall adapter or a computer or charged with an external battery charger. If the 18650 battery is charged in the device, the battery bar on the screen will keep flashing during charging and the screen will go out when fully charged.
Firmware Upgrading:
The firmware can be upgraded by connecting the device with a computer through the USB port via a micro USB cable.
Properties Atomizer Protection:
each time when vaping time exceeds 10 seconds, the output shuts off automatically with “Over 10s” display on the screen.
Atomizer Low Alert:
when the resistance of coil is lower than 0.1ohm in VW/Bypass mode or lower than 0.05ohm in TC modes, the screen will display “Atomizer Low”.
Atomizer Short-circuit & No Atomizer Protection:
when atomizer short-circuit occurs, the screen will display “Atomizer Short”. The screen will display “No Atomizer” when there is no atomizer connected.
Low-voltage Protection:
when the voltage of the battery is below 3.3V, the screen will first display “Battery Low” and then “Lock”. Charge the battery to unlock the device.
Temperature Protection:
in TC modes, when the actual temperature of coil reaches the set temperature, the screen will display “Temp Protection”. You can continue to use the device normally.
Temperature Alert:
if the temperature of device is over alert temperature, the output will shut off automatically and the screen will display “Device Too Hot”. You can continue to vape after it cools down
Weak Battery Alert:
in all vaping modes, when the device is working with an atomizer and the voltage of the battery drops below 2.9V, the screen will display “Weak Battery”. Meanwhile, the output power will be reduced accordingly.
Warranty
We are not responsible for any damages caused by human error. Legal warranty is applied.
Warnings
1. Please keep out of reach of children.
2. This product is not recommended for use by young people, non-smokers, pregnant or breast-feeding women, or persons who are allergic/sensitive to nicotine.
Contra-indication
1. Do not attempt to repair the product by yourself as damage or personal injury may occur.
2. Do not leave the product in high temperature or damp conditions, otherwise it may be damaged.
3. Do not use this product for other purposes except only for vaping and don’t swallow the e-liquid.
Possible Adverse Effects
1. This product may be hazardous to health and contains nicotine which is addictive.
2. For people with adverse reaction after using this product, it is recommended to use the e-liquid with lower nicotine content or no nicotine